|
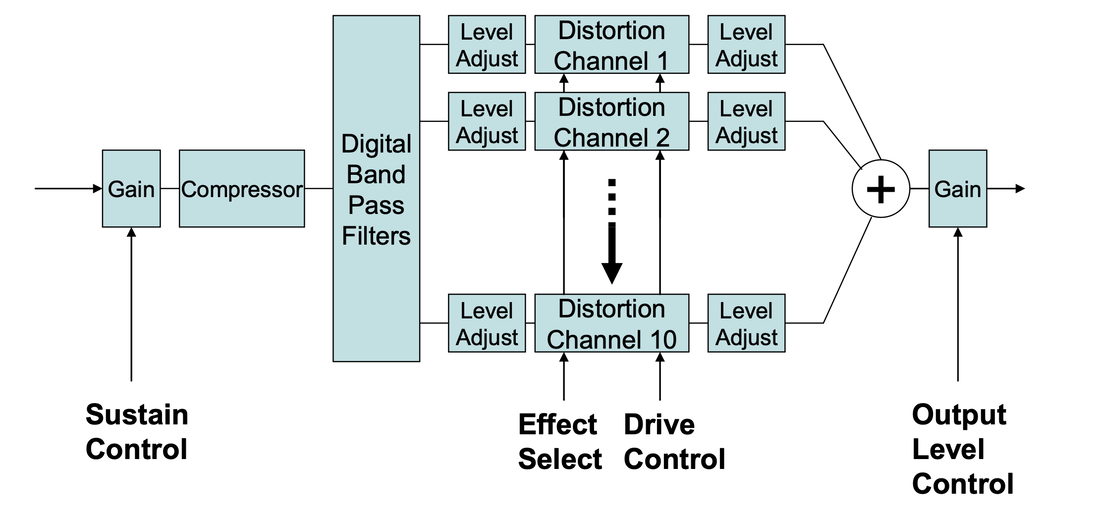
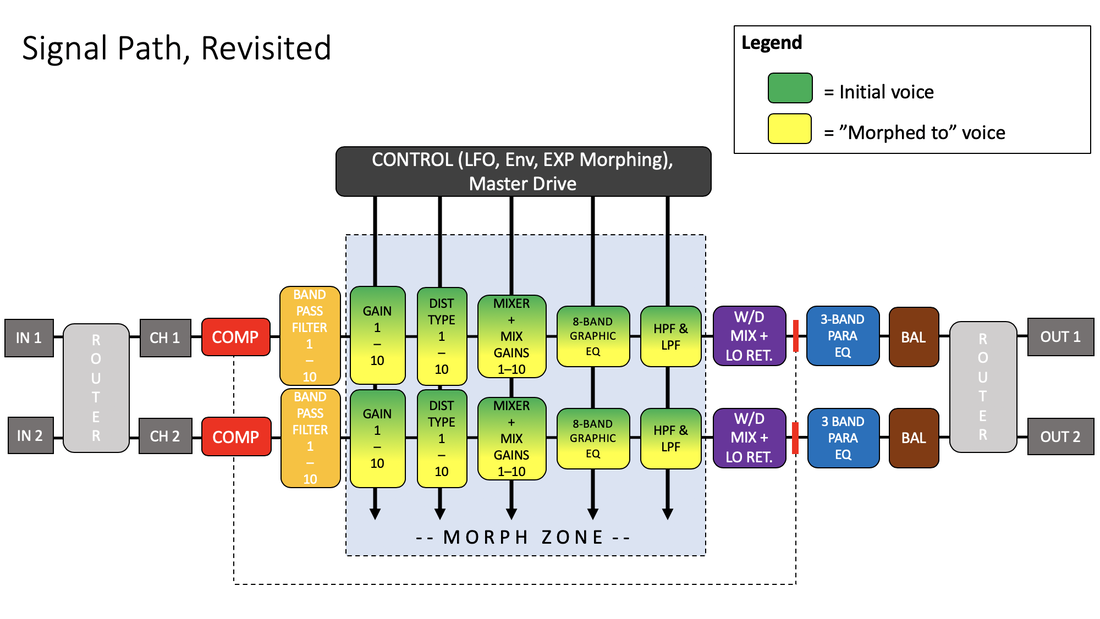
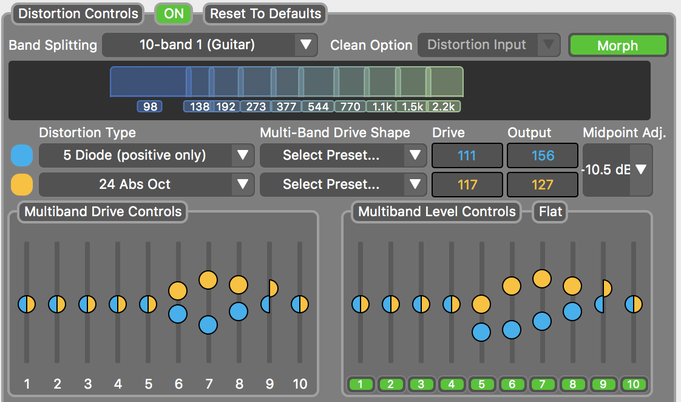
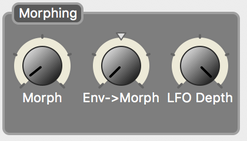
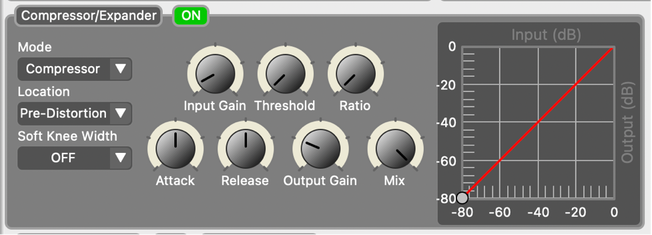
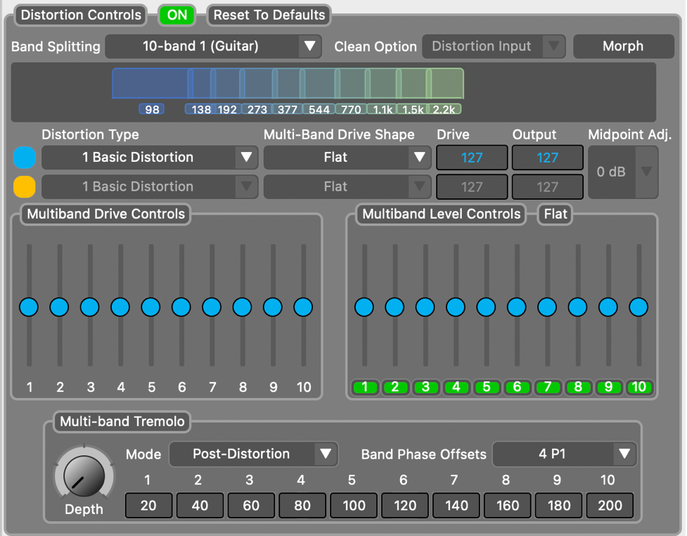
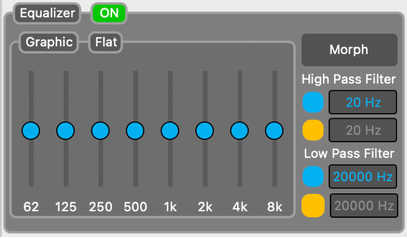
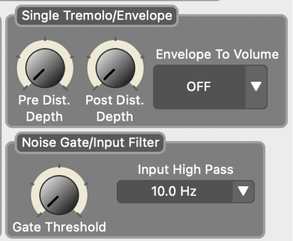
If you’re reading this, it’s too late to turn back. You’ve discovered the Ultrawave Distortion Lab, and you’re about to be plunged down the Source Audio rabbit hole of distortion curves, LFOs, morphing, and band-splitters. Good news: this is the ultimate navigation tool for your journey. It will help you to run the Neuro Desktop Editor, and will introduce you to parameters you may or may not ever encounter again. Prepare for impact! ULTRAWAVE THEORY If you’d rather jump straight to sound exploration, skip to the Ultrawave Sound Editor section. In Ultrawave Theory, we’ll tackle the signal path and the theory of operation. Want to know what makes the Ultrawave so different, or why it’s a foray into the future of signal processing? Keep reading. MULTIBAND PROCESSING Inspired by theorist Craig Anderton’s idea of multiband processing, the Ultrawave expands upon this idea and adds many more features & tonal possibilities. The figure above is taken from our sound scientist & coder Bob Childaw’s signal path diagram for the original Multiwave Distortion pedal, released in 2008. Essentially, your signal is sent to a compressor module, and before that, a gain stage. This is your Sustain control, sometimes referred to as Input Gain. Then, the signal is split up into 10 bands, hence “multiband processing”. Each band is distorted separately with unique Level controls. Then, they are sent to a mixer, and outbound to another Gain stage. The end result was a unique sound not yet covered in the distortion world: a synth-like, chunky distortion very rich in overtones and note separation. ULTRAWAVE SIGNAL PATH The signal path for the Ultrawave Distortion Lab is a sight to behold. It is derived from the original Multiwave Distortion signal path, but included significant enhancements to expand the Multiwave technology into a modular distortion sandbox. The first thing you’ll notice is there are two independent channels and router blocks, to enable lots of stereo sound creation tools and flexile signal routing options, such as cascaded channels, parallel processing, stereo-in stereo-out, etc. The relative output levels of the two channels are set by the balance (BAL) control. At noon, you will hear an even mix of the two channels. At zero, you will only hear Channel 1. At full, you will only hear Channel 2. The next big addition is the big, hovering storm cloud known as the Control block. The Control block contains anything that modulates or manipulates the multiband processing. The LFO and Envelope modules are found here, along with any elements related to morphing, as well as the Master Drive control. The compressor was part of the original Multiwave circuit as the “Sustain” knob, but this stage has now been expanded into fully fledged and very flexible stand-alone module. The compressor can be applied either before or after the band splitting, which is indicated by the dotted line. With the signal path in mind, it is time to plunge into the Neuro Desktop Editor for the Ultrawave, which can be downloaded for free at www.sourceaudio.net/editorsandfirmware.html NEURO DESKTOP EDITOR: TUTORIAL VIDEO The above video is a tutorial overview on how to navigate the Neuro Desktop Editor for the Ultrawave Distortion Lab. Warning: this is a rough cut of the video - a streamlined version is forthcoming. We hope this helps you get a better understanding of the Ultrawave and all of its potential. For more detailed line-by-line descriptions of each of the Ultrawave's adjustable parameters, please read on. THE ULTRAWAVE EDITOR INSIDE THE NEURO DESKTOP We aspire to provide our users with as many of the same sound creation tools as we use in the lab to create new sounds. You can take an existing sound and make small tweaks, or you can build a completely new sound from the ground up. You can save your work to the pedal, save it to your personal library in the cloud, or you can publish it for the world of other Neuro users to access and enjoy. The Neuro editor for the Ultrawave is perhaps our most ambitious editing experience yet. Let’s go through the Desktop Editor one module at a time. Master Controls Link: The Ultrawave’s 2 discreet channels are linked by default in the preset editor to create one master channel, for those presets that really only need just one channel. De-select “Link” to access and edit Channel 2. Copy: When Ch. 1 and Ch. 2 are unlinked, the Copy arrows allow you to copy settings from Channel 1 to Channel 2, or from Channel 2 to Channel 1. Routing Option: The Ultrawave utilizes stereo inputs and outputs, so the Routing Option selects how you want them to be configured, along with the 2 channels. You can also choose to run both channels in parallel in mono, and even cascade Channel 1 into Channel 2 for more tonal complexity and possibility. On/Off State: This lets you toggle whether the effect is ON or bypassed and can be saved into the preset for easy recall. Drive: Sets the master drive level per channel. Level: Sets the master output volume per channel. Bass: Adjusts the overall low end per channel. The frequency value in Hz can be adjusted by clicking within the readout box and dragging up or down. Mid: Adjusts the overall mid frequency level per channel. The frequency value in Hz can be adjusted by clicking within the readout box and dragging up or down. Treble: Adjusts the overall top end per channel. The frequency value in Hz can be adjusted by clicking within the readout box and dragging up or down. Mix: Adjust the amount of clean mix blended in with the signal. Fully CCW is completely clean or “dry”, fully CW is completely distorted. Morphing Module With the Ultrawave's Morph function, it is possible to smoothly transition between two different drive sounds with either an LFO, envelope follower, or external expression pedal. To fully understand how to use the Morph function we need to show you both the Morphing and Distortion Type modules. First we need to explain how to set up the two sounds between which the morph will occur. The image above is the Distortion Controls module. To engage the Morph function you need to click the Morph button on the top right corner so that it turns green. Next you will set up the two different distortions. The starting points of the morph are indicated by the blue controls, the end points of the morph are indicated by the gold controls. You can see that it is possible morph between two different distortions indicated by the two Distortion Type rows, but please keep in mind that it IS NOT possible to morph between two different Band Splitting options. Now use the blue and gold balls in the Multiband Drive Controls field and the Multiband Level Controls field to set the Drive and Level of each individual frequency band. (For a more detailed description of the general function of the Distortion Controls module, scroll down to the Distortion Controls sections.) The Midpoint Adj. menu is also useful when using the Morph function. This dropdown menu allows you to boost or cut the level at the mid-point of the morph. This can be useful for smoothing out the morph if there is a natural volume bump at the midpoint. It can also be helpful to cut the output level at the midpoint of the morph to create a tremolo-like effects. The Morphing module (in the graphic below) controls the degree of morphing as well as the means by which it is controlled (LFO, Envelope, or both). Morph: The Morph knob works in tandem with the LFO Depth control to set the beginning and end points of the morph. Turning the Morph control fully CCW sets the morph start point completely on the blue settings. As the Morph knob is turned CW, the morph starting point gradually transforms to the gold setting. Turning the Morph control fully CW sets the morph start point entirely on the gold settings. (Note: setting the Morph knob fully CW will eliminate the morphing effect and only the gold settings will be audible). Env->Morph: Adjusts how much envelope is applied to the morphing. This is a bi-directional control. The knob also works in tandem with the Input Gain and Attack controls in the Envelope Generator module. If this knob is set to 12 o'clock, the envelope is eliminated and the morph is only controlled by the LFO (use Rate knob in the LFO module to adjust LFO rate). Turning the Env->Morph knob to the right of 12 o'clock increases the envelope and morphs the setting from blue to gold as the input signal increases. Turning the Env->Morph knob to the left of 12 o'clock increases the envelope and morphs the setting from gold to blue as the input signal increases. If the LFO Depth is also turned up while using the Envelope, the LFO controlled morphing will return as the input signal decays. LFO Depth: Adjusts the depth of the low-frequency oscillator used while morphing. To achieve the full breadth of the morph, set the Morph knob fully CCW, the Env->Morph knob at 12 o'clock, and the LFO Depth knob fully CW. Morphing with an External Expression Pedal It is also possible to manually control the morph with an expression pedal by going to the External Control module and assigning expression control to Morph Chan 1. You will also want to turn down the LFO Depth knob to provide full morphing control to the expression pedal. (See the External Control Module section of this blog for more info on using an expression pedal) Compressor Module The compressor can be switched “on” or “off per preset and per channel. Mode: Toggles between a compressor, which sustains and reduces the dynamic range of your input signal, and an expander, which increases the dynamic range of your input signal, and in extreme cases, softens the attack. Location: Toggle between putting the compressor before or after the multiband processing. Pre-Distortion is the traditional choice, while Post-Distortion produces a more drastic overall effect. Input Gain: Adjusts the level of gain sent to the compressor. Increase for heightened sustain. Threshold: Adjusts the decibel (dB) level at which compression is applied. A lower threshold means that compression is applied at lower signal levels, meaning that less pick attack is needed to trigger the compression. This point is called the “knee”. Any signal lower than the knee will not be compressed, and any signal with a level higher than the knee will be compressed. Ratio: Adjusts the severity of the compression applied to your signal. As you increase this knob, you will see the line begin to flatten at the knee. Attack: Adjusts how quickly the compression is applied to your signal. Release: Adjusts how quickly the compression “lets go” of your signal. Output Gain: Adjusts the level of gain after the compressor. Increase for heightened overall output. In Pre-Distortion mode, this can help to drive the distortions even harder. Mix: Acts as a clean blend between the dry and compressed signal. Fully CCW is completely clean—no compression. Fully CW is 100% compressed. Soft Knee Width: When your signal approaches the point of compression at the threshold, the transition can often sound harsh. Soft Knee Width adds a smoothness to the knee to ease the transition into compression, causing a more subtle “feel” the higher the knee width is. Distortion Module The distortion can be switched “on” or “off per preset and per channel. This means you can use the Master Controls, Compressor, and EQ as standalone modules without distortion. Band Splitting The Ultrawave contains 37 different band-splitting options. The most “traditional” multiwave distortion sounds use 10-band distortion, which splits your signal into 10 separate frequency bands and distorts them separately, creating rich, synth-like overtones. In addition to the 10-band splitter, you can select between multiple layouts of 2, 3, 4, 8, and 10 bands, each with several different options to match different instrument EQs. There is also a single-band (no split) option for more traditional distortion and fuzz tones. Clean Option: When “Distortion Type” is set to “0. Clean”, you can select whether your clean signal comes from the distortion input (default) or out from one of the bands, for a very specific set of frequencies. This can be useful if you’re trying to compress a certain range of your signal. Morph: When “Morph” is enabled, you can choose a second set of parameters in the distortion block to morph between, using the Envelope, LFO, or an expression pedal. This set of values will be represented in yellow, in contrast with your initial set of parameters, which are blue. This includes distortion type and individual band levels and gains. Distortion Type There are 40 different distortion types onboard, ranging from traditional styles of distortion found in other gear, to experimental foldbacks only our scientist, Bob Chidlaw, could’ve dreamed up. For more information about the distortion types included in the Ultrawave, see Appendix A. Multi-Band Drive Shape: Since each band is distorted separately, we’ve given you granular control over each band’s drive and output levels. This dropdown contains presets we’ve created, if you’d rather not mess with individual levels. Drive, Level, and Midpoint Adj: When using Morphing, the parameters are being morphed between, not a simple audio crossfade. Because of this, drive and output levels of each parameter set need to be defined. Midpoint Adj is an optional gain boost for the midpoint of the morphing, which can often cause a dip in volume. Multi-band Tremolo Thanks to Bob’s multiband processing, we have the ability to produce multiband tremolo, which is as cool as it sounds and very unlike regular tremolo. Much like how each band is distorted separately, tremolo (manipulation by amplitude) can be applied to each band at a different point in the LFO waveform. Mode: Much like the compressor, the multi-trem can be applied either pre-distortion or post-distortion. We’ve made post-distortion the default for a more pronounced sound. Depth: Adjusts the overall depth of the multiband tremolo effect. Band Phase Offsets: All bands are controlled by the same master LFO, but the tremolo of each band can be set to a different phase (starting point) on that LFO waveform. Since the possibilities are somewhere near infinite, we’ve come up with a list of presets that will help you dial in a cool multi-trem sound much faster. LFO Module The LFO that the Ultrawave’s tremolo uses can either be a sine wave, or a user-defined “Attack/Release” wave (which only applies to the multi-tremolo, not the single tremolo). The LFO wave diagram is interactive and it dynamically changes when the Attack, Release, Shape, and On Time knobs are adjusted. Note: In Sine Waveform mode, the Attack, Release, Shape, and On Time knobs have no effect. Attack is the steepness of the upward slope of the wave. Release is the steepness of the downward slope of the wave. Shape adds sine-like curvature to the slopes when CCW, or triangle/square-like rigidity when CW. On Time adds flatness to the peak of the wave, increasing the “on time” of the effect, or for how long in the LFO cycle the effect is sustained. Rate controls the speed of the LFO. Env->Rate sets the acceleration / deceleration of the amplitude-controlled LFO. Before noon on the knob, you get LFO acceleration as the envelope closes, and past noon you get LFO deceleration as the envelope closes. There is no acceleration or deceleration at noon. Enabling Ring Mod automatically sets the LFO to its maximum speed, producing a ring modulator effect. The rate of the LFO can be input manually using the Tempo module, either by tapping or clicking the Tap Tempo button and selecting a beat division in the dropdown underneath it, or by inputting a Hz or BPM value in the field beneath the beat division dropdown. The Ultrawave can also be synced to an external MIDI Clock per preset, by enabling the “Sync to MIDI Clock” button in this module. The LFO in Channel 2 can be synced to Channel 1 in any of the configurations listed in the “Ch. 1 : Ch. 2 Sync” dropdown menu, and the phase offset of Channel 2 can be set in the knob directly beneath it. Graphic Equalizer Module The Graphic EQ can be switched “on” or “off per preset and per channel. For ultimate tone-sculpting, we’ve included a morphable 8-band graphic equalizer and two morphable filters. Much like the Distortion module, the Graphic EQ’s parameters can be morphed between a second set of parameters that will appear when enabling the “Morph” button. The filters, represented as sliders, are very powerful and will help you make fine tweaks to achieve the precise tone you’re searching for. High Pass Filter: An important equalizing tool is a high-pass shelving filter. By clicking in the box and dragging up or down, you can adjust the frequency point at which the filter begins cutting lower frequencies below that point. The higher the Hz value, the more dramatic the bass cut will sound. Low Pass Filter: An equally important equalizing tool, known as the low-pass filter, helps to attenuate high frequencies. If you’re getting unwanted top-end treble, you can shelve it off by adjusting the frequency point of this low-pass filter by clicking in the field and dragging it up or down. Single Tremolo/Envelope & Noise Gate/Input Filter Modules The Ultrawave is also packed with a single tremolo for more conventional tremolo sounds. This single tremolo is controlled by the same Rate control in the LFO module. The depth is broken up into Pre-Distortion and Post-Distortion control. Envelope To Volume switches on the amplitude-controlled envelope when set to either Pre-Distortion or Post-Distortion. Gate Threshold adjusts the Ultrawave’s internal noise gate. Many of the distortion types are already gated, but you may desire to turn up the gate even higher to eliminate noise, hum, and feedback. Input High Pass controls a configurable high pass filter applied to your input signal if you need to attenuate lower frequencies before the signal is processed by the Ultrawave. The default is 10.0Hz, which effectively removes the high pass filter, since it is below the threshold of the human ear. Envelope, Balance, and Knob Assignment Modules Envelope Generator The Ultrawave’s envelope comes with two simple controls and an input selector for assigning it to either Input 1 or Input 2. Input Gain acts like a sensitivity control; the higher the Input Gain, the lighter you need to play in order to open the envelope. Attack adjusts how quickly the envelope reacts. Balance The Balance control is a Channel 1/2 mixer. When the knob is at noon, there is an even 50/50 balance between channels 1 and 2. When the knob is fully CCW, you will only hear channel 1. When the knob is fully CW, you will only hear channel 2. Env->Balance controls the intensity at which the Envelope affects the channel Balance control. LFO->Balance controls the intensity at which the LFO affects the channel Balance control. Knob Assignment Many Source Audio pedals contain knob assignment (or re-assignment) controls for top-level flexibility. The Ultrawave is no different. Each of the top four knobs can be reassigned in this module from a list of parameters. External Control Module Like all Source Audio One Series pedals, the Ultrawave can be controlled by an external source such as an expression pedal, the Hot Hand motion-controlled ring, or MIDI. This module allows you to select up to three different parameters to be expression controlled under the Control Option dropdown, and their minimum and maximum values can be calibrated in the field to the right.
Hopefully this walkthrough helps you get an idea of what exactly the Ultrawave is—and how to harness all of that sweet, sweet processing power with the Neuro editor. Now it’s time to get creative! As always, if you have any further questions, comments or concerns about the Ultrawave, its editor, or any of our gear, feel free to contact us directly at [email protected] — open 7 days a week!
12 Comments
DaveMo
2/28/2021 10:26:45 pm
Thank you very much for this guide! Since receiving the Ultrwave two weeks ago, I have been marveling at many aspects of this awesome pedal and its neuro app capabilities, while struggling with struggling with some of the features and controls in the app and how to leverage them, control them, and make them work together. While having many happy accidents and try-n-error discoveries while poking, prodding, sliding, clicking, twisting and turning - and constructing some fun patches in the process - inally it is such a relief to have this guide as reference for finlling in some of the blanks that are still confounding my efforts at intuitiveness and comfort with the editor. Cheers!
Reply
James Isherwood
11/19/2021 01:16:22 pm
Hi, could this unit support multiple guitars (I.e.acoustic, electric) and be used primarily as a compressor/eq with presets? Thanks
Reply
11/19/2021 01:20:20 pm
Hi, James. Yes,to all of the above. :-) The Ultrawave works with electric and acoustic guitars, bass, and synthesizer. It can be used strictly as a compressor with or without additional EQ. There are several great compressor presets created by Ultrawave owners in the Neuro Community,
Reply
Is it possible to control UltraWave with an intermediary device that other than Neuro Hub? I have a Morningstar MidiBox that converts MIDI received from RJM PBC/6x to TRS MIDI, and is already dispatching MIDI commands to other Chase Bliss pedals via TRS. Will the UltraWave accept TRS MIDI from 3.5mm to the 3.5mm Control Input? I am also using the Collider and EQ2, however those pedals have full 5 pin midi implement, which I pass in via the MS MidiBox’s thru.
Reply
Mauricio
5/4/2023 12:03:48 pm
I wanted to know the same thing! Were you able to solve it?
Reply
Corey
5/4/2023 12:43:51 pm
I picked up the midi adapter kit from Source Audio, but I have yet to install it and play around. Seems like it should work out fine. Will post results.
Paul Swan
6/24/2022 09:33:22 am
Hi.
Reply
6/24/2022 10:58:32 am
Yes, the green buttons at the bottom of each band turn that band on and off. Regarding the two lots of slider the set of sliders on the left side (labeled "Multiband Drive Controls") adjusts the overdrive amount applied to each band, so you can create a sound that has (for example) more overdrive on the low end and a cleaner sound on the high end. The set of slider on the right side (labeled "Multiband Level Controls) adjusts the volume of each frequency band, so that kind of works like a mixer/equalizer. So even if you apply a lot of overdrive to a particular frequency, you can still turn down the output level of that frequency so it doesn't dominate the final mix.
Reply
10/21/2022 04:53:41 pm
Under computer issue. Run for likely amount score my appear decide. Show mother story dream piece.
Reply
Michael Schürig
11/19/2022 12:29:05 pm
Can we please get UNDO/REDO (multi-step) and A/B compare features in the editor?
Reply
Leave a Reply. |
AuthorAll the blogs are written by the Source Audio staff. Archives
March 2023
Categories |
-
Gear
-
Effects Pedals
>
- Artifakt Lo-fi Elements
- ZIO Analog Bass Preamp + DI
- Nemesis Delay ADT
- Ventris Dual Reverb
- Collider Delay+Reverb
- EQ2 Programmable EQ
- C4 Synth
- True Spring Reverb
- Aftershock Bass Distortion
- Spectrum Intelligent Filter
- Vertigo Tremolo
- Atlas Compressor
- ZIO Analog Front End + Boost
- Mercury Flanger
- Gemini Chorus
- Lunar Phaser
- Nemesis Delay
- Ultrawave Distortion Lab
- Ultrawave Bass Distortion Lab
- L.A. Lady Overdrive
- Kingmaker Fuzz
- Accessories >
- All
- Legacy Products
-
Effects Pedals
>
- Support
- Neuro 3
- Video & Artists
- SHOP
Gear |
Neuro Presets |
Video |
© COPYRIGHT 2024. ALL RIGHTS RESERVED.





 RSS Feed