Navigating the Neuro Desktop Editor with the Collider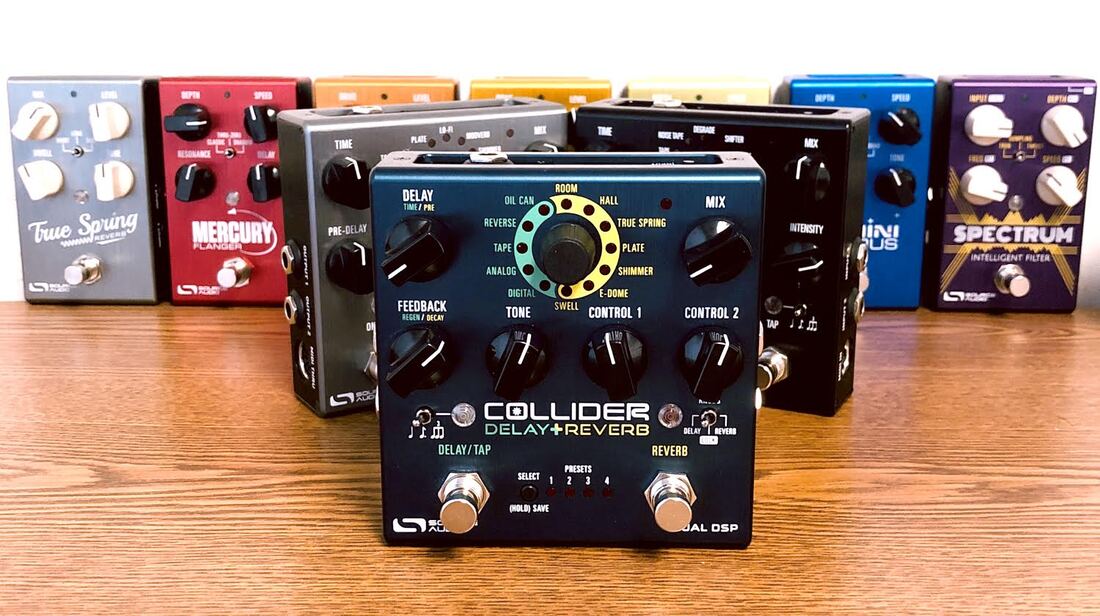 The Neuro Desktop Editor is a quick and easy way to make sounds and presets with any of your One Series pedals. The editor is not essential for discovering awesome and unique tones on the Collider, but it can help you get there quicker and more efficiently, and with the peace of mind that you can click a “Save” button after every move you make. The Neuro Desktop Editor is also the key to periodic firmware updates for our pedals and gets updated regularly itself with bug fixes and feature additions. 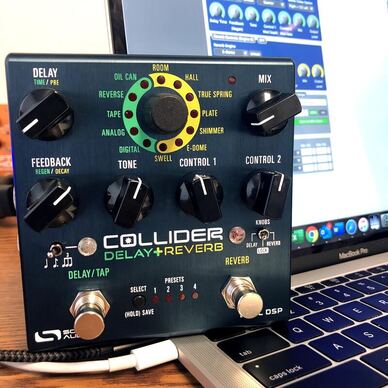 Below is a section-by-section, top-to-bottom review of all the controls available on the Collider Delay+Reverb’s desktop editor. For a brief quick-start guide to the basic functions of the Neuro Desktop Editor, read our Navigating the Neuro Desktop Editor blog. Keep in mind that most of these controls are also available on the face of the Collider, so if you need to make adjustments on the fly, you can do so without having to worry if you’re unable to make them as precise as you need. Peruse the Collider Delay+Reverb Manual or the Collider Quick Start Card for more info on navigating the hardware. Delay Controls (Engine A) 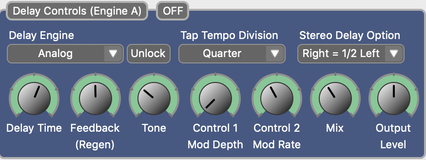 The topmost section controls the parameters of the Delay (left) engine. In Cascade Mode, this engine comes first in the signal path. Delay Engine – This dropdown menu allows you to select which delay engine you’d like to use. Choose between 5 distinct delay tones from our Nemesis Delay pedal. Unlock – Pressing this button enables you to “unlock” the engine selector, giving you access to both Reverb and Delay effects. This allows for any combination of Delay+Reverb, Delay+Delay, Reverb+Reverb, and so on. Tap Tempo Division – This drop down allows you to change the beat division of the tap tempo function. The switch on the Collider contains 3 beat divisions (quarter, dotted eighth, and triplets by default), but there are more possibilities in the editor. Stereo Delay Option – Choose how the delay behaves in a stereo environment. The default is “Right = ½ Left” which is a ping-ponging effect. If you’d prefer a more standard stereo delay, select “Right = Left” from this menu. Delay Time – Controls how fast or slow the delay repeats are. Turn it to the left for quick, “slapback” delay speeds, and turn it to the right for long, ambient repeats. Feedback – Adjusts how many times the delay repeats itself. Turn it all the way to the left for just one single repeat or crank it to cause the delay to self-oscillate. There is a “sweet spot” on the knob, about 3 o’clock, that will give you infinite or near-infinite repeats without going into self-oscillation. Tone – Adjusts how dark or bright the delay repeats are. Useful for creating your ideal Analog or Tape sound. In Reverse Delay mode, “Tone” affects the number of voices. Control 1 (Mod Depth) & Control 2 (Mod Rate) – Each engine has the option to be modulated with a chorus/vibrato sounding effect—hence why you don’t see a “modulated delay” engine on these pedals. Control 1 and Control 2 on the Collider control the rate and depth of this modulation respectively. These controls can get wild! Mix – Controls the overall wet/dry mix of the signal. Just before 3 o’clock is a 50/50 wet/dry split. In Parallel Mode, MIX has a slightly different feature. See the “Controls” section of the manual for more details. Output – Usually left alone, this knob controls the overall output of the signal, with 0 on the knob being no output, and max on the knob being about +6 dB. Reverb Controls (Engine B) 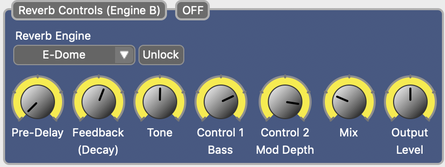 The second section contains parameters for your Reverb (right) engine. In Cascade Mode, this engine comes second in the signal path. Reverb Engine – This dropdown menu allows you to select which delay engine you’d like to use. Choose between 7 distinct reverb sounds from our Ventris Reverb pedal. Unlock — See above. Tone – Adjusts the amount of treble in your reverb tail. Control 1 & Control 2 – Because of the wide array of reverb engines and the need for varied parameters, we armed the Collider with 2 engine-specfic “Control” knobs that change function depending on the Reverb engine. For more details on what these knobs control, visit the “Reverb Engines” section of the manual. Mix – See above. Output – See above. Routing Options & Tap Tempo 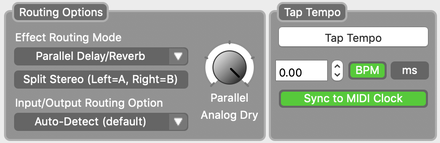 Effect Routing Mode – Select between Parallel Delay/Reverb and Cascade modes. Parallel Mode essentially means your signal is processing Engine A and Engine B simultaneously as if it were a single effect. Cascade, or series mode, signifies you’re running Engine A before Engine be in the signal path, just like running a delay pedal before a reverb pedal. Split Stereo (Left=A, Right=B) – Enabling this button allows you to separate your engines in a stereo setup. If you’re playing with two amps, Engine A will go to one amp and Engine B will go to the other. Parallel Analog Dry Knob – This knob is only active when your pedal is set to Parallel mode. Leave it cranked for unity dry signal or turn it all the way to the left to go fully wet with your effects—great for studio applications. I/O Routing Option – For Collider, we decided to simplify the routing options in contrast with the massive amount of options available on the Ventris Dual Reverb. “Auto-Detect” is the most common choice, but for more detailed routing options, please visit the Routing Options section of the manual. Tap Tempo – The center “Tap Tempo” button allows you to tap in a desired tempo with your cursor. Below that on the left, you can manually enter in a tempo with a BPM or millisecond value, toggled by the “BPM” and “ms” buttons on the right. The bottom button allows you to sync your Collider to an external MIDI Clock. External Control 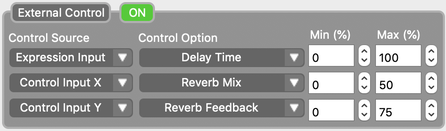 Control Source – Selects which type of expression controller and input will be used for the preset. Control Option – Use this dropdown to choose which parameter you’d like to control with external expression. Control Min % – Determines the minimum/OFF value the expression pedal or external switch is assigned to, per parameter. If the switch is OFF or the pedal is at its heel, this is the value that will be represented. Control Max % – Determines the maximum/ON value the expression pedal or external switch is assigned to, per parameter. If the switch is ON or the pedal is at its toe, this is the value that will be represented. Hardware Options 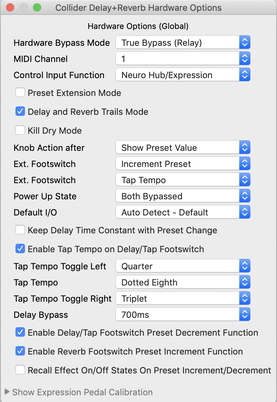 Clicking the gear icon when the Collider is hooked up to the Neuro Desktop will open a set of hardware options that will help fully implement the Collider into your own rig. Here’s a quick rundown of the hardware options on the Collider:  Hardware Bypass Mode: Choose between True Bypass and Analog Buffered Bypass. MIDI Channel: Select which MIDI channel the Collider operates on. The default is channel 1. Control Input Function: Sets the function of the Control Input jack on the top of the pedal. Preset Extension Mode: Check this box to change the number of available preset slots on the Collider from 4 to 8. Delay and Reverb Trails Mode: Check this box if you’d like your delay or reverb tails to continue even after switching off the pedal. Kill Dry Mode: Kills the dry signal. Useful in a studio or a W/D (or W/D/W) setting! Knobs Action After: This will alter the function of the knobs after loading a preset. Do you want them to always reflect their physical position on the pedal, or do you want to discover where they were set in that preset? The choice is yours. Ext. Footswitch: These two dropdowns allow you to set the function of both external jacks on the top of the pedal. Power Up State: Choose which engines automatically turn on upon plugging in the pedal. The default is that neither will turn on. Default I/O: Select the Collider’s default routing option. The norm is Auto-Detect. Keep Delay Time Constant with Preset Change: ‘Nuff said. Enable Tap Tempo on Delay/Tap Footswitch: This is checked by default, but you can disable internal tap tempo if you’d just like to use the left footswitch for a single function (engaging and disengaging Engine A). Tap Tempo Left/Center/Right: Use these dropdowns to assign a custom beat division to the toggle switch on the left side of the pedal. Delay Bypass: This menu sets how long you have to hold the Delay/Tap footswitch to disengage the Delay engine. Setting it longer can improve the accuracy of the tap tempo function. Enable Delay/Tap Footswitch Preset Decrement Function: When enabled, you can hold down the Delay/Tap footswitch to cycle backward through presets. Enable Reverb Footswitch Preset Increment Function: When enabled, you can hold down the Reverb footswitch to cycle forward through presets. Recall Effect On/Off States on Preset Increment/Decrement: When enabled, the on/off status of each effect will be recalled based on how you set it when you saved the preset. Say you saved a sound with only delay engaged in preset 1, and a sound with both delay and reverb engaged in preset 2. When you scroll from 1 to 2, the effects will turn on or off accordingly.  If you’ve read this far you probably want to know what engines are on the Collider, and we’re happy to indulge you: Oil Can – A dark, sloshy delay, characteristic of those old “oil can” units. Having it here is a bit of a space saver! Reverse – A backwards delay, great for adding unorthodox sounding “space” to a lead line or solo. Tape – A vintage tape sound, with mild distortion and other artifacts like wow&flutter. Analog – A warm, murky delay, carefully crafted to replicate the classic bucket brigade units. Digital – A pristine, all-purpose digital delay. Room – Captures the ambient reverberations of a real acoustic space. The ROOM engine can summon a variety of room sizes from a warm and intimate household room to a larger theatre sized space, and has the option of being modulated. Hall – Patterned after the lush Lexicon rack reverb units of the 80s. Our sound engineer, Bob, spent a looooong time perfecting this one. Almost as long as the reverb tail itself! ;) True Spring – This engine from the Ventris, emulating the drippy spring from 60s Fender amps, inspired a while spin-off pedal, the True Spring Reverb. Plate – The 70s never seemed so recent. Plate offers 3 distinct plate sizes and replicates the reverb sounds created from those huge metal plates in the studio. Shimmer – A reverb that blooms into an octave-up effect. Perfect for heavenly soundscapes. E-Dome – A massively ambient reverb that models a giant stadium arena. The effects of E-Dome can last for days, but we prescribe it if you’re feeling too dry. Swell – Yes, it’s very swell! It also swells your dry signal into a reverb tail; great for pad-like effects! Thanks for checking out the Collider Delay+Reverb. We’d love to hear what sounds you discover with it, and as always, feel free to reach out to us at [email protected] with any further questions, comments, concerns or suggestions!
13 Comments
Eric Peterson
1/26/2020 06:10:02 pm
I was hoping that there were some additional tone-shaping options in the editor (like there are for the Ventris and Nemesis). Apparently it's limited to just what's shown on the pedal panel.
Joshua Grammon
2/21/2020 04:52:37 pm
Me too!!! I was a surprised that the “deep editor” was basically all the stuff on the front panel. I still use the editor for managing presets in a hurry, but I have to admit I thought it would offer more. I’d like to see access to more engines (echorec, please) and deeper control of the current engines... I can’t seem to get the analog to sound like my memory man. I’d love to be able to get that sound cleaner and brighter.
Deqan
4/11/2020 03:20:56 pm
Same here, I assumed that I could switch out some effects on the board and replace them with the ones on the app, just like in the nemesis, it sure got me excited for a while imagining the beautiful possibilities if it could be done with the reverb engine as well. 10/25/2020 11:34:03 pm
Is it true there is no deep editing of the delay and reverb engines?
Vinicius Marcilio
5/9/2021 03:07:50 pm
Andrew
9/8/2020 06:06:40 pm
Can't get Neuro Desktop to work on OSX 10.15.6. OSX is claiming it is malware.
Vinicius Marcilio
5/9/2021 02:46:36 pm
Hi,
Leigh Tintle
2/23/2023 01:30:16 pm
Came across this looking for the minimum delay time of the Collider, but I think I have a way for you to make it work. In the Neuro app or editor, if you set the tap tempo to 1600 ms (16 x 100 ms), then set one delay tap tempo division to Sixteenth notes (1600 ms/16 = 100 ms) and the other to Dotted Eighth notes (1600 ms/8 x 1.5 =300 ms) that should get you where you want to be. Hope this helps!
Terry Lewis
1/23/2022 05:20:20 pm
Loving this pedal. 11/11/2023 11:32:54 pm
Could you provide a walkthrough on how to use the Collider for navigation in the Neuro Desktop Editor? 12/24/2023 10:14:12 am
What are the key functionalities of the Collider in the Neuro Desktop Editor, and how do users navigate through them? Leave a Reply. |
AuthorAll the blogs are written by the Source Audio staff. Archives
March 2023
Categories |
-
Gear
-
Effects Pedals
>
- Artifakt Lo-fi Elements
- ZIO Analog Bass Preamp + DI
- Nemesis Delay ADT
- Ventris Dual Reverb
- Collider Delay+Reverb
- EQ2 Programmable EQ
- C4 Synth
- True Spring Reverb
- Aftershock Bass Distortion
- Spectrum Intelligent Filter
- Vertigo Tremolo
- Atlas Compressor
- ZIO Analog Front End + Boost
- Mercury Flanger
- Gemini Chorus
- Lunar Phaser
- Nemesis Delay
- Ultrawave Distortion Lab
- Ultrawave Bass Distortion Lab
- L.A. Lady Overdrive
- Kingmaker Fuzz
- Accessories >
- All
- Legacy Products
-
Effects Pedals
>
- Support
- Neuro 3
- Video & Artists
- SHOP
 RSS Feed
Gear |
Neuro Presets |
Video |
© COPYRIGHT 2024. ALL RIGHTS RESERVED.