Navigating the Neuro Mobile App with the Ventris Dual Reverb
|
Neuro Mobile App and the Ventris Dual Reverb: A Tutorial Video
|
On its own the Ventris Dual Reverb is an easy-to-use yet powerful stereo reverb effects pedal. Connecting the Ventris to the Neuro Mobile App or Neuro Desktop Editor dramatically expands the pedal's functionality and sonic territory.
Out of the box the Ventris offers 12 different styles of reverb, from organic Spring, Plate, Hall, and Room tones to thoroughly modern and unnatural sounds like Shimmer, Reverse, Swell, and Offspring. The Ventris is built of two independent reverb processors, which offer significant advantages like immense processing muscle, adjustable preset spillover time, and the ability to run two reverb effects simultaneously. In addition the Ventris includes 128 presets, stereo inputs and outputs, analog dry-through, hard or soft (a.k.a. "trails") bypass modes, external expression control, reverb hold, tap tempo, full MIDI control, and more.
"Putting too many controls on the face of a pedal undermines the daily user experience, particularly in live situations. However, there are times when it is nice to access deep parameters, browse sound libraries, or create and share your own sounds," says Smith. "With the release of our Neuro Mobile App and Desktop Editors for the Ventris Dual Reverb, we seek to provide musicians access to highly advanced sounds and features without losing the fun and immediate feel of a vintage stompbox."
The Neuro Mobile App is a free download for iOS and Android. It massively expands the possibilities of the Ventris Dual Reverb with its ever growing collection reverb effects (called "Reverb Engines"), extended set of editing parameters, and useful preset organizing and sharing abilities. Below is a line-by-line explanation of every adjustable parameter and function selector included in the Neuro Mobile App.
The Neuro Mobile App is available right now - you don't need to own a One Series pedal to get it. Just go to the Apple App Store or Google Play and search for "Source Audio Neuro." Connect the App to the Ventris with the 1/4" to 1/8" TRS cable that comes with every Ventris. The cable runs from the headphone jack on the phone to Input 2 on the Ventris. Turn the volume all the way up on the phone (some Android devices may require that you turn the volume down one or two clicks from its maximum level). Watch the video below for step-by-step instructions on connecting the Neuro Mobile App to Source Audio One Series pedals.
|
|
Instructional Video on Connecting the Neuro Mobile App to Source Audio One Series Pedals
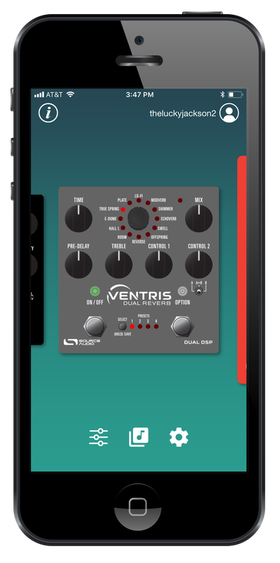
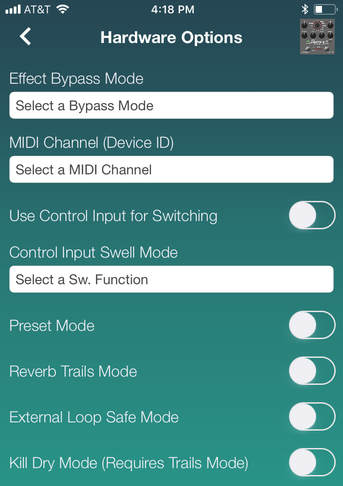
Scroll to the Ventris Dual Reverb image of the Pedal Selection page and click the gear icon to open the Hardware Options menu (see the graphic below). Use the Hardware Options window to choose your pedal’s universal hardware settings.
All of the settings in the Ventris Dual Reverb's Hardware Options menu are global, meaning they cannot be selected on a preset-by-preset basis. Global changes will remain enacted until they are deselected in the Hardware Options menu or a Factory Reset is performed.
- Effect Bypass Mode: Select between True or Buffered Bypass.
- MIDI Channel (Device ID): Select the pedal’s MIDI channel.
- Use Control Input for Switching: Allows you to use the Ventris's 1/8" CONTROL INPUT with a one button external footswitch (The Source Audio Tap Tempo Switch is a good option). Use the Control Input dropdown menu (located in the field just below) to select the function of the external switch. (See the Ext. Footswitch section below for details on selecting "Engine Tap Function" from the Control Input dropdown menu)
- Preset Extension Mode: This mode adds an additional 4 user presets for a total of 8 presets accessible without MIDI messages.
- Reverb Trails Mode: Avoids an abrupt cut-off and allows your reverb trail to decay naturally upon bypassing the pedal.
- External Loop Safe Mode: If you are placing pedals in the Ventris' effects loop, this mode will prevent runaway feedback.
- Kill Dry Mode (Requires Trails Mode): Completely eliminates the dry signal from the pedal’s output. Kill Dry Mode is helpful when using the Ventris in an effects send.
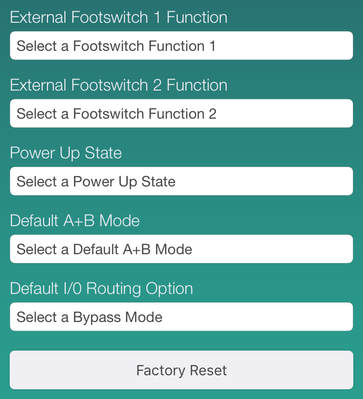
- External Footswitch 1 & 2 Functions: Assign switching functions to a two button external footswitch. Please note - external switches only work as latching switches (not "momentary") - if you choose "Engine Tap Function" in the dropdown menu, the external switch will default to whatever function has been assigned to the Tap action of the Ventris's OPTION footswitch. It is possible to change the Ventris's Tap function on a preset-by-preset basis. Choosing "Toggle Single A/B Mode" allows toggling between Reverb A and Reverb B within each preset.
- Power Up State: You can choose whether the Ventris is engaged (on Preset 1) or disengaged after the power up process.
- Default A+B Mode: Select between Parallel and Cascade (a.k.a. “Series”) as the default A+B Toggle Switch Mode.
- Default I/O Routing Option: Sets the a global stereo routing option. Please note: the Default I/O Routing Option can be overridden on a preset-by-preset basis. See the I/O Routing Option section in the Ventris User Manual for details on the different routing options.
Click the Slider icon on the bottom of the Pedal Selection page (after scrolling to the Ventris Dual Reverb) to open the Ventris Dual Reverb’s Sound Editor interface. This is where all of the sound editing work takes place.
The Sound Editor for the Ventris is broken into several sections, each containing a unique variation of sliders and dropdown menus. The following is a brief explanation of each Sound Editor sub-section. Note: not every parameter or function is described here - if you have a question about an unexplained parameter, please email us at [email protected] for details.
The Sound Editor for the Ventris is broken into several sections, each containing a unique variation of sliders and dropdown menus. The following is a brief explanation of each Sound Editor sub-section. Note: not every parameter or function is described here - if you have a question about an unexplained parameter, please email us at [email protected] for details.
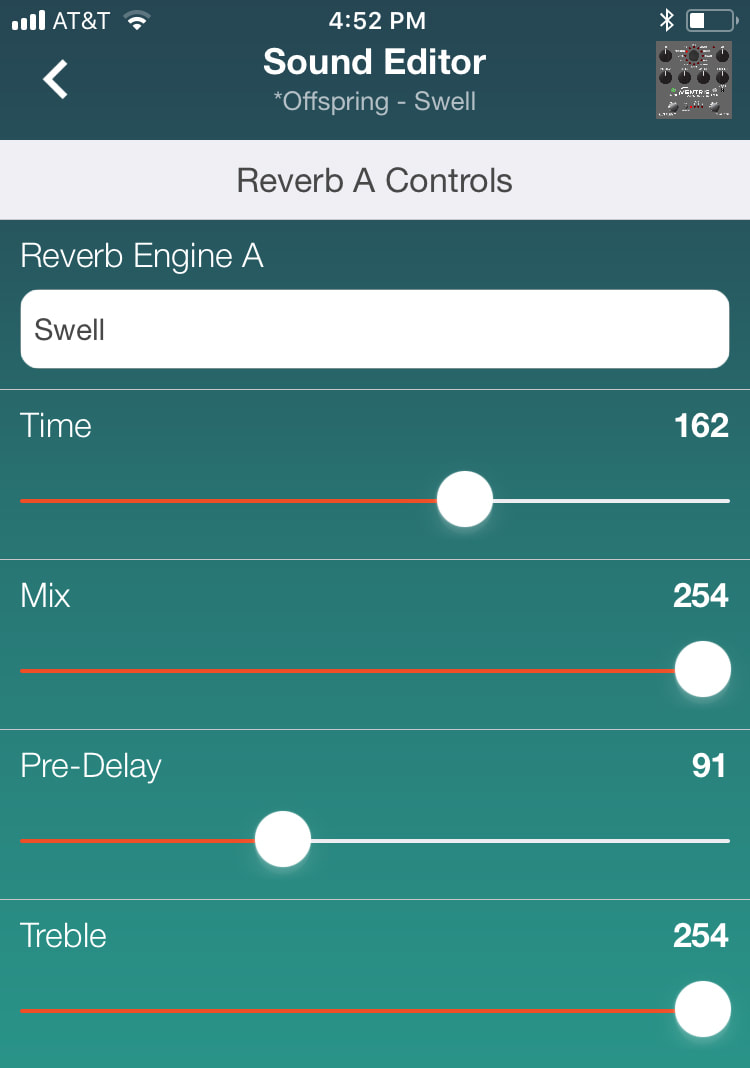
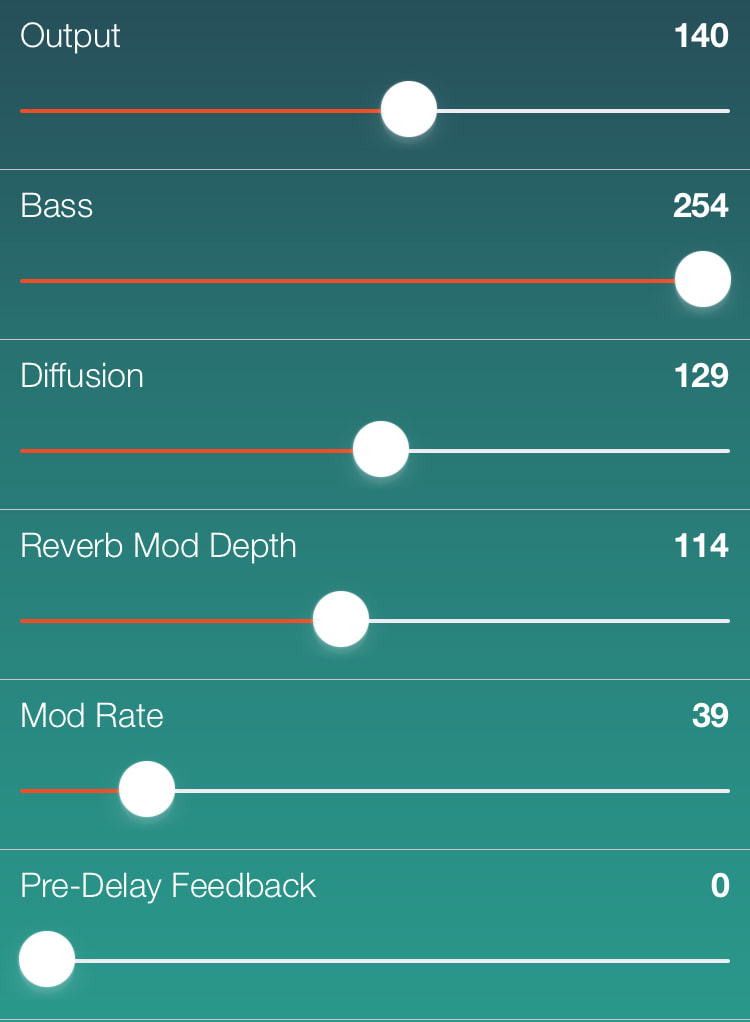
Reverb A Controls: This section of the Neuro Mobile App's Ventris Sound Editor contains a powerful collection of editing tools for Reverb A.
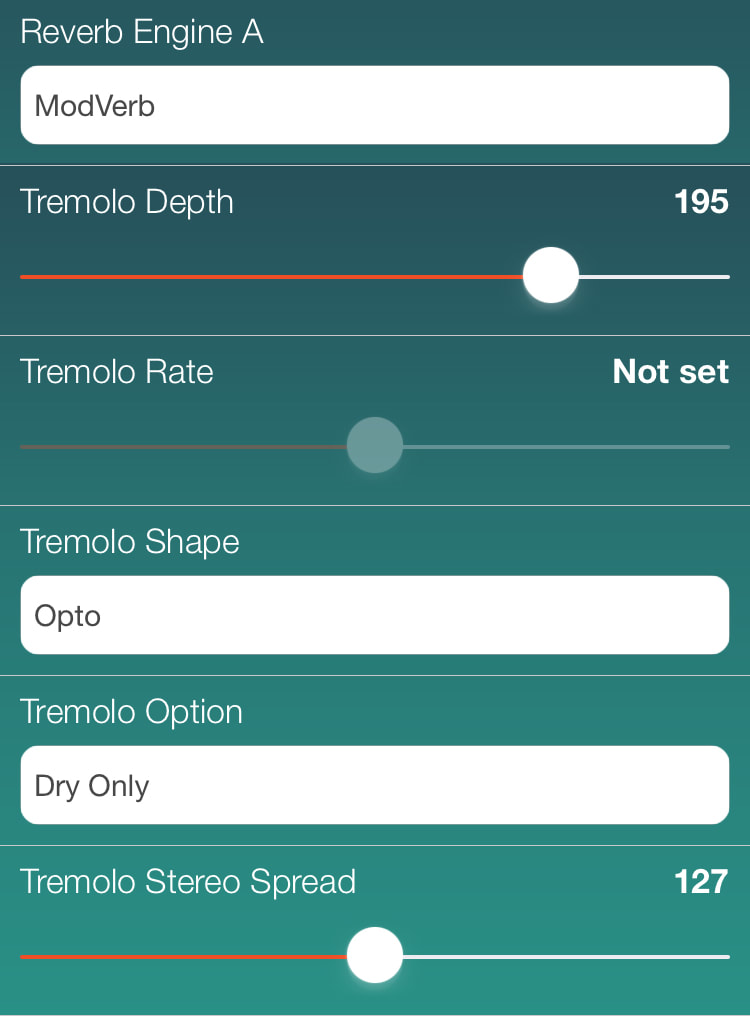
- Reverb Engine A: Use this dropdown menu to select the reverb engine for Reverb A. You will notice that in addition to the twelve engines available on the Ventris Reverb’s Effect Selector knob, there is an ever-growing collection of additional reverb engines. Go to the Reverb Engines and Extended Reverb Engines section in the Ventris Dual Reverb User Manual for a complete list and explanation of each available reverb type.
- Time: Sets how long the reverb trail will sustain.
- Mix: Sets the wet/dry signal ratio. Push all the way to the left for 100% dry and all the way to the right for 100% wet.
- Pre-Delay: Sets the amount of time between the dry signal and the first reverb reflections.
- Treble: Boosts or cuts the high frequencies of the wet signal.
- Output: Boosts or cuts the level of the wet signal.
- Bass: Boosts or cuts the lower frequencies of the wet signal.
- Diffusion: Blurs the reverb trail. Turn up the Diffusion to make the effect smoother or turn down the Diffusion for more of an echo effect.
- Reverb Mod Depth: Sets the amount of pitch modulation in the wet signal.
- Mod Rate: Adjusts the speed of the pitch modulation in the wet signal.
- Pre-Delay Feedback: Controls the circulation amount in the pre-delay taps. Increasing the Pre-Delay Feedback creates an echo effect of sorts.
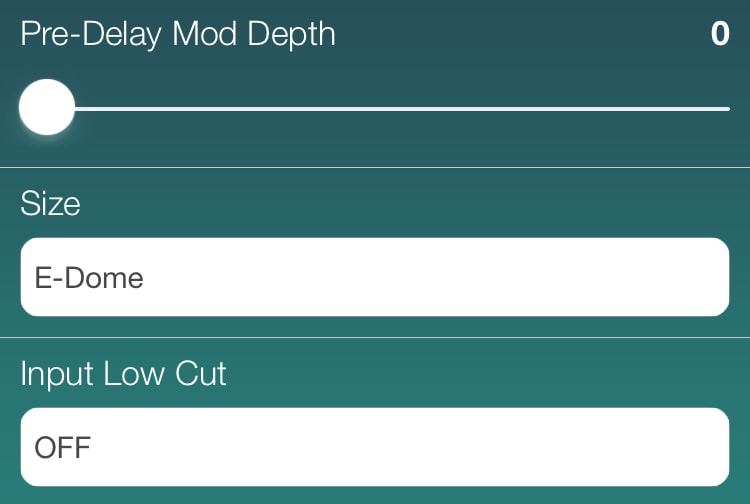
- Pre-Delay Mod Depth: Increased the pitch modulation of the Pre-Delay taps.
- Size: This dropdown menu offers a subset of root settings within most of the reverb engine. For example: within the Hall L engine there is a choice between five different Hall sizes: Normal, Medium, Large, Extra Large, and Enormo-Hall.
- Input Low Cut: Applies a low cut filter to the dry signal. Low cut filters block all frequencies below the cut-off point. Available cut-off points include 20Hz, 100Hz, 125Hz, 150Hz, 200Hz, 250Hz, or Engine Default Settings.
Engine Specific Controls: This set of virtual knobs and dropdown menus changes depending on selected reverb engine. For example the Modverb engine (see above graphic) requires engine specific controls like Tremolo Depth and Rate that do not apply to any of the other reverb engines.
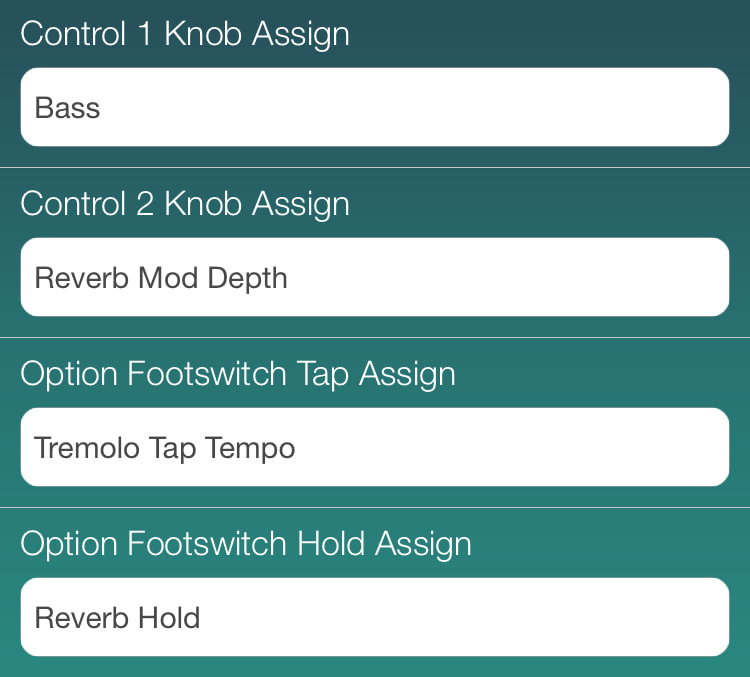
Control Knob Assign: By default the CONTROL 1 & 2 knobs on the Ventris Dual Reverb are assigned to specific parameters depending on the selected reverb engine. But it is also possible to reassign the function of these two knobs within each preset. The Control Knob Assign dropdown menus offer a variety of additional, assignable parameters.
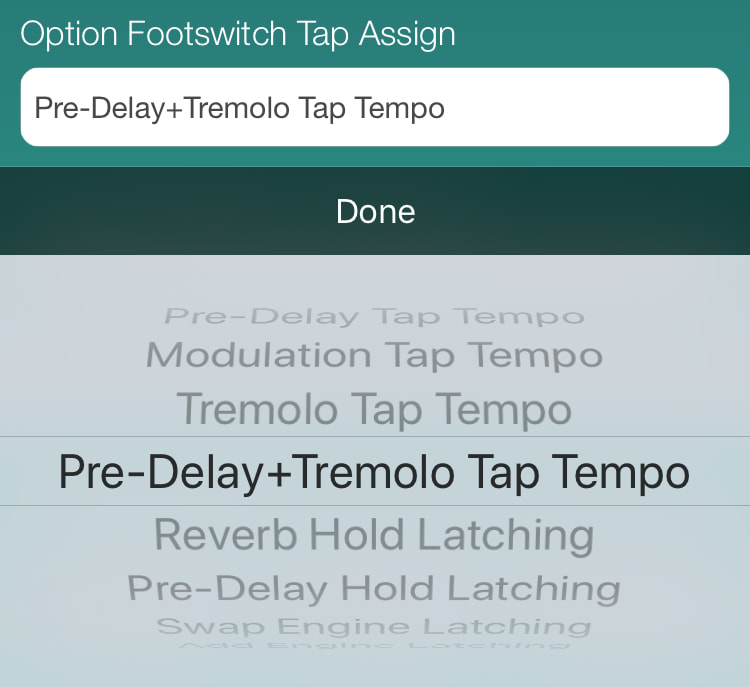
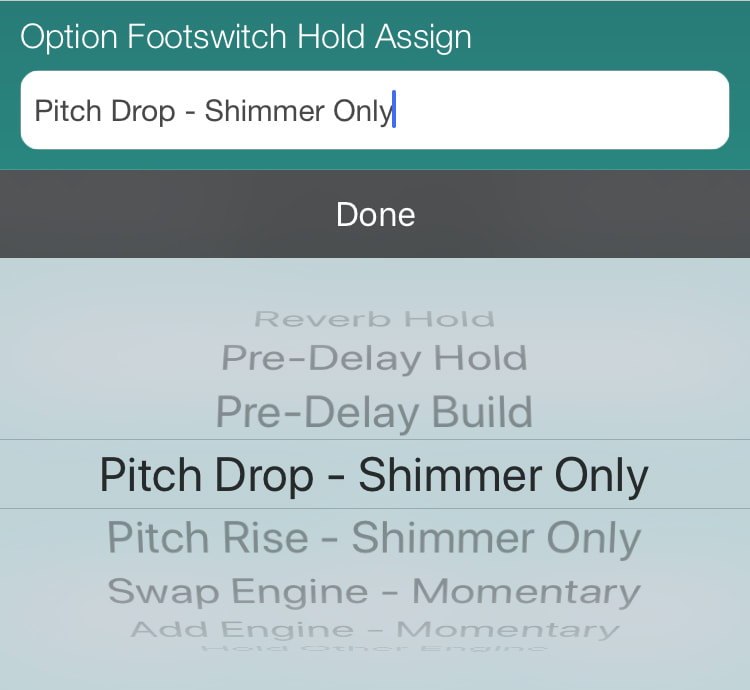
Option Footswitch Assign: Tapping or holding the Ventris Dual Reverb’s OPTION footswitch accesses specific default functions, depending on the selected reverb engine. In addition, it is possible to reassign these footswitch functions. The Option Footswitch Assign dropdown menus offer a variety of additional footswitch functions. The Option Footswitch Assign dropdown menus (see below) offer a variety of additional footswitch functions.
Option Footswitch Assign: Tapping or holding the Ventris Dual Reverb’s OPTION footswitch accesses specific default functions, depending on the selected reverb engine. In addition, it is possible to reassign these footswitch functions. The Option Footswitch Assign dropdown menus offer a variety of additional footswitch functions. The Option Footswitch Assign dropdown menus (see below) offer a variety of additional footswitch functions.
Option Tap Dropdown Menu Choice: All of the following functions are accessible by tapping the OPTION footswitch.
- Pre-Delay Tap Tempo – Use the Option footswitch as a tap tempo of set the time of the Pre-Delay. Similar to a delay pedal this allows you to create an echo effect by changing the time between the dry signal and the first reverb reflections. Note: you must tap the switch more that two times in succession to change the Pre-Delay time.
- Modulation Tap Tempo – Tap to set the rate of the pitch modulation in the wet signal.
- Tremolo Tap Tempo – Tap to set the time of the tremolo when using the Modverb Engine.
- Pre-Delay + Tremolo Tap Tempo – Simultaneously sets the speed of the tremolo pulse and the reverb Pre-Delay time of the Modverb engine.
- Reverb Hold Latching – Sustains the reverb trail with a single tap of the Option switch. Tap the Option switch again to release the Reverb Hold function and let the reverb trail decay.
- Pre-Delay Hold Latching – Sustain the Pre-Delay with a single tap of the Option switch. Tap the Option switch again to release the Pre-Delay Hold function.
- Swap Engine Latching – Tap the Option switch and move from Reverb A to Reverb B. Tap again to go back to Reverb A.
- Add Engine Latching – Tap the Option switch to add Reverb B to Reverb A (A+B Mode). Tap again to return to only Reverb A.
- Pitch Drop Latching – Shimmer Only – While using the Shimmer engine, a single push and release of the Option switch sustains the reverb trail and engages the Pitch Drop function, creating a dive-bomb effect with the Shimmer’s pitch interval. Tap the Option switch again to release the Pitch Drop function and let the reverb trail decay.
- Pitch Rise Latching – Shimmer Only – While using the Shimmer engine, a single push and release of the Option switch sustains the reverb trail and engages the Pitch Rise function, creating gradual rise in the Shimmer engine’s pitch interval. Tap the Option switch again to release the Pitch Rise function and let the reverb trail decay.
Option Press and Hold Dropdown Menu Choices: All of the following functions are accessible by pressing and holding the OPTION footswitch. The Press and Hold action is also known as “Momentary Switch” action, which engages the assigned function only as long as the OPTION footswitch is held down. (Note: The Press and Hold action is available to only the OPTION switch, it is not possible to assign this action to an external switch).
- Reverb Hold – Sustains the reverb trail while holding down the Option switch. While sustaining the trail of Reverb A, Reverb B will be applied to the dry signal. This allows you to play a reverb effected lead line on top of Reverb A’s sustained trail.
- Pre-Delay Hold - Sustain the Pre-Delay.
- Pre-Delay Build – Sustains and recirculates the Pre-Delay creating an intensifying effect known as self-oscillation.
- Pitch-Drop – Shimmer Only – While using the Shimmer engine, holding down the Option switch sustains the reverb trail and engages the Pitch Drop function, creating a dive-bomb effect with the Shimmer’s pitch interval.
- Pitch-Rise – Shimmer Only – While using the Shimmer engine, holding down the Option switch sustains the reverb trail and engages Pitch-Rise function, creating gradual rise in the Shimmer engine’s pitch interval.
- Swap Engine – Momentary – Hold the Option switch and switch from Reverb A to Reverb B. Release the switch and go back to Reverb A.
- Add Engine – Momentary – Hold the Option switch to add Reverb B to Reverb A (A+B Mode). Release the switch to return to Reverb A alone.
- Hold Other Engine – Add and Hold the trail of Reverb B, while maintaining the undisturbed reflections of Reverb A. For details and diagrams on the Hold Other Engine function go to the Reverb Hold Function section of the Ventris Dual Reverb User Manual.
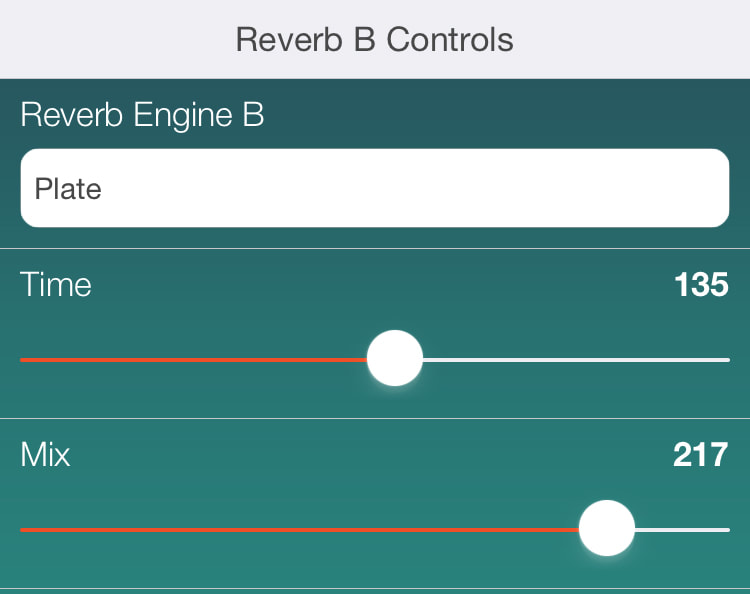
Reverb Engine B Controls: Every control option available in the Reverb A block is mirrored in Reverb B block. See the Reverb Engine A sections for detailed explanations the Reverb Engine B Controls.
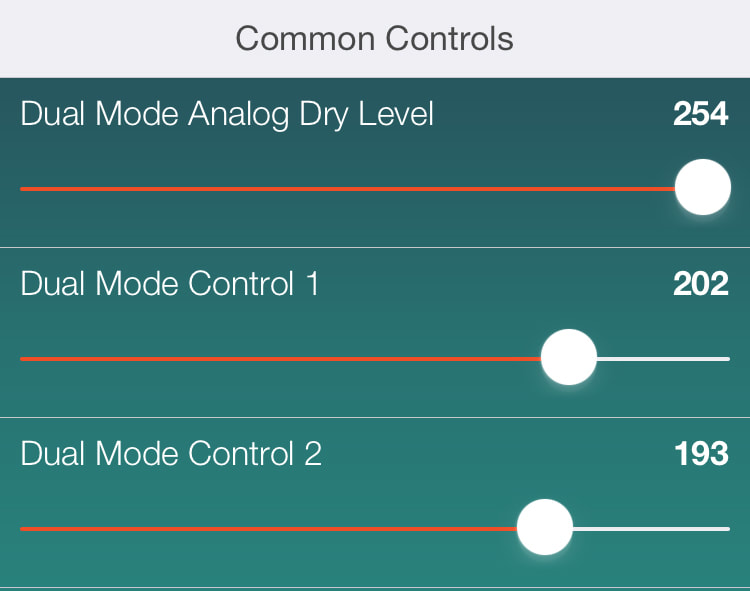
COMMON CONTROLS: While running two reverb engines simultaneously in either Dual Parallel A + B or Dual Cascade A -> B Modes (see the Dual/Single Mode dropdown menu), it is useful to independently control the levels of Reverb A, Reverb B, and the dry signal. Use the Sound Editor’s Dual Mode Analog Dry Level to control the level of the dry signal, Dual Mode Control 1 to control the wet level of Reverb A, and Dual Mode Control 2 to set the wet level of Reverb B.
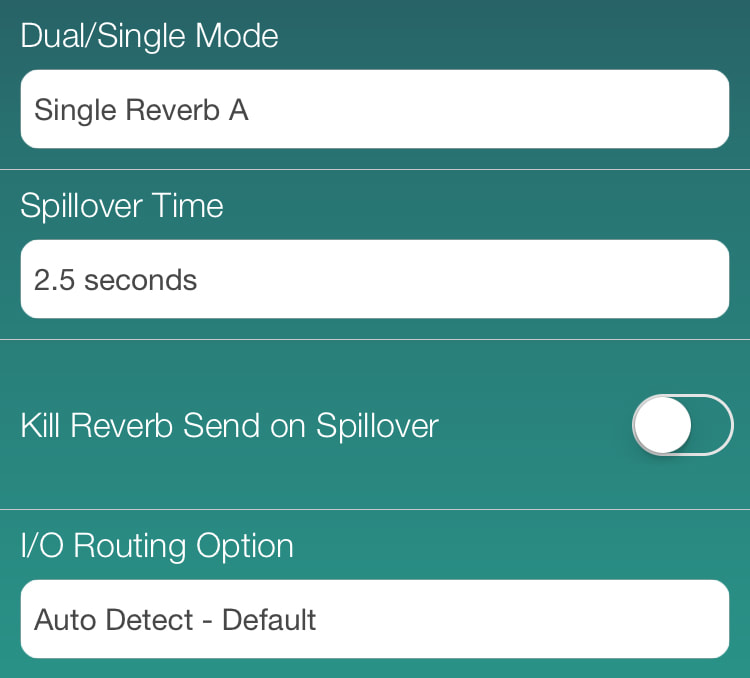
Dual/Single Mode: Selects the virtual position of the A/B Toggle switch on the Ventris Dual Reverb. Select whether you want to edit Reverb A, Reverb B, or Reverb A + B. In addition you can select between a Parallel or Cascade signal path for Reverb A + B.
Spillover Time: One of the major advantages of the Ventris Dual Reverb’s dual processor architecture is the ability to adjust the spillover time when changing from one single engine preset to another. Rather than abruptly cutting off the reverb trail, spillover allows for a smooth and natural transition between presets by letting the initial reverb decay naturally. In the case of switching away from a preset with an extremely long decay time, it can be useful to shorten the final decay with an alternate Spillover Time. Use the Spillover Time dropdown menu to adjust the decay time, which can be set for up to 20 seconds. (Note: Spillover does not apply when changing to or from a Dual Reverb Mode (A+B).
Kill Reverb Send On Spillover: Click this box to stop the dry signal from feeding into the reverb preset you have exited during the spillover period. For example - imagine you are using a preset with an E-Dome reverb engine that has a very long trail, and you have set the Spillover Time for 15 seconds and checked the Kill Reverb Send box. When you switch away from that E-Dome preset its reverb trail will start its decay and no longer respond to the incoming dry signal.
I/O Routing Option: Select the routing configurations of Inputs and Outputs 1 & 2. See the Stereo Operation & Signal Routing section in the Ventris Dual Reverb User Manual for a detailed explanation of each routing option.
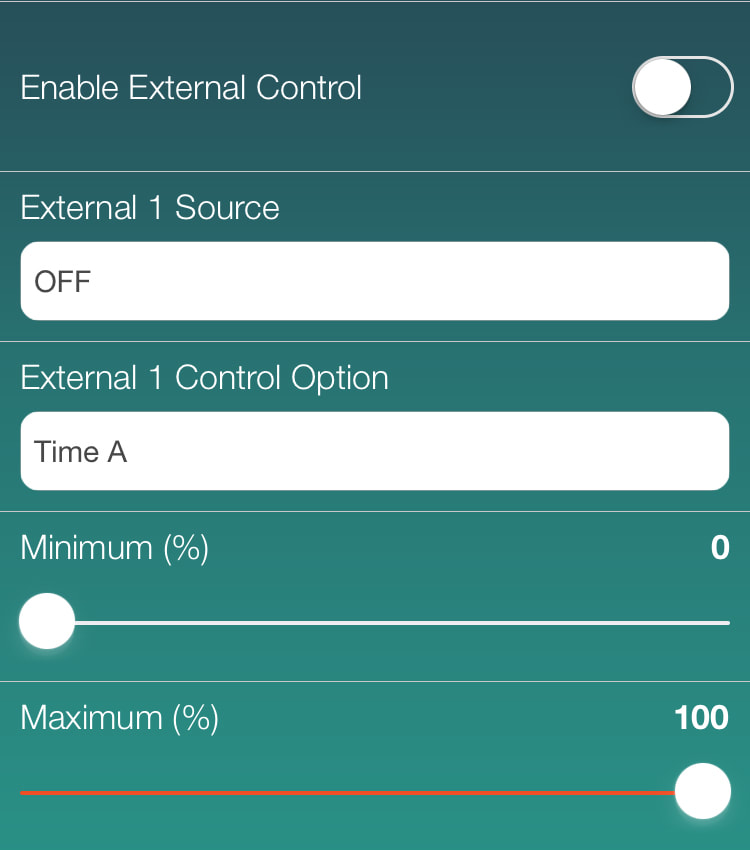
External Control: Control up to three parameters with an external expression pedal or a Hot Hand 3 Universal Wireless Expression Controller. Use the dropdown menus in the External Control block to select the expression device (External 1 Source) and controlled parameter (External 1 Control Option). Use the Min and Max fields to set the depth of the expression sweep. Note, this block is repeated three times allowing you to assign simultaneous expression control to three parameters.
On/Off Status (MIDI Recall): Use the dropdown menu to select whether a preset is engaged or disengaged upon receiving a MIDI program change (PC) message. Sometimes it is useful to queue-up a preset in a disengage state that is accessible by manually hitting the ON/OFF footswitch on the Ventris.
The three buttons at the bottom of the Sound Editor page are used to save and name presets. Presets can be saved either directly to a Ventris Reverb or to a personal preset library. The tree buttons include File Menu, Burn, and Send All.
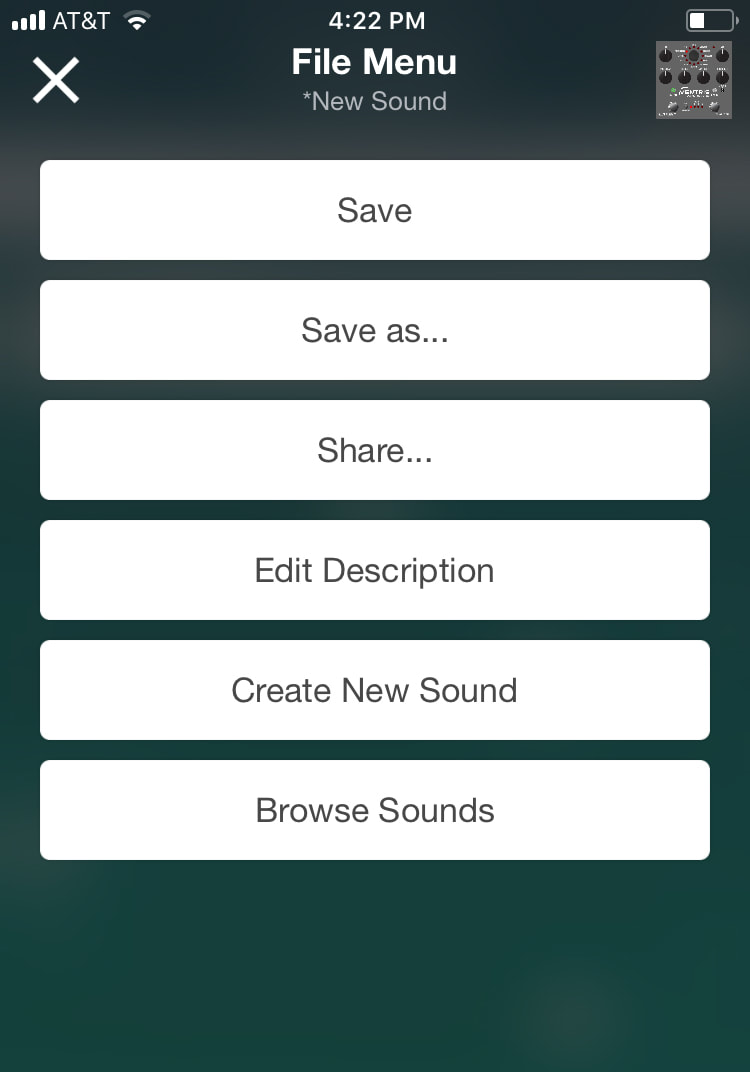
File Menu: Opens the File Menu page. The page contains options for saving and sharing presets as well as editing preset descriptions.
Burn: Uploads the current preset directly to the Ventris Dual Reverb. Choose between any of the 128 preset positions or override one of the default engines on the pedal's Effect Selector knob.
Send All: Sends all the current engines and parameter positions of the Sound Editor directly to the pedal. It's a good idea to hit this button before starting the editing process to ensure that you are correctly hearing the proper settings of the Neuro Mobile App.
- Save - After creating a preset, hit the Save button and the Save As window pops up. Here you can name your preset and give it a description. Hit the Continue button and the preset is saved to the User tab on the Browse Sounds page.
- Save As - When working from an existing preset, use the Save As button to create a new preset without deleting the original.
- Share - Quickly send the current preset to friends or bandmates. Choose between text message, email, Facebook, Dropbox and more.
- Edit Description - Change the description of the current preset.
- Create New Sound - Zeros out all the current settings and creates a blank slate for the creation of a new preset.
- Browse Sounds - Goes directly to the Browse Sounds page.
Burn: Uploads the current preset directly to the Ventris Dual Reverb. Choose between any of the 128 preset positions or override one of the default engines on the pedal's Effect Selector knob.
Send All: Sends all the current engines and parameter positions of the Sound Editor directly to the pedal. It's a good idea to hit this button before starting the editing process to ensure that you are correctly hearing the proper settings of the Neuro Mobile App.
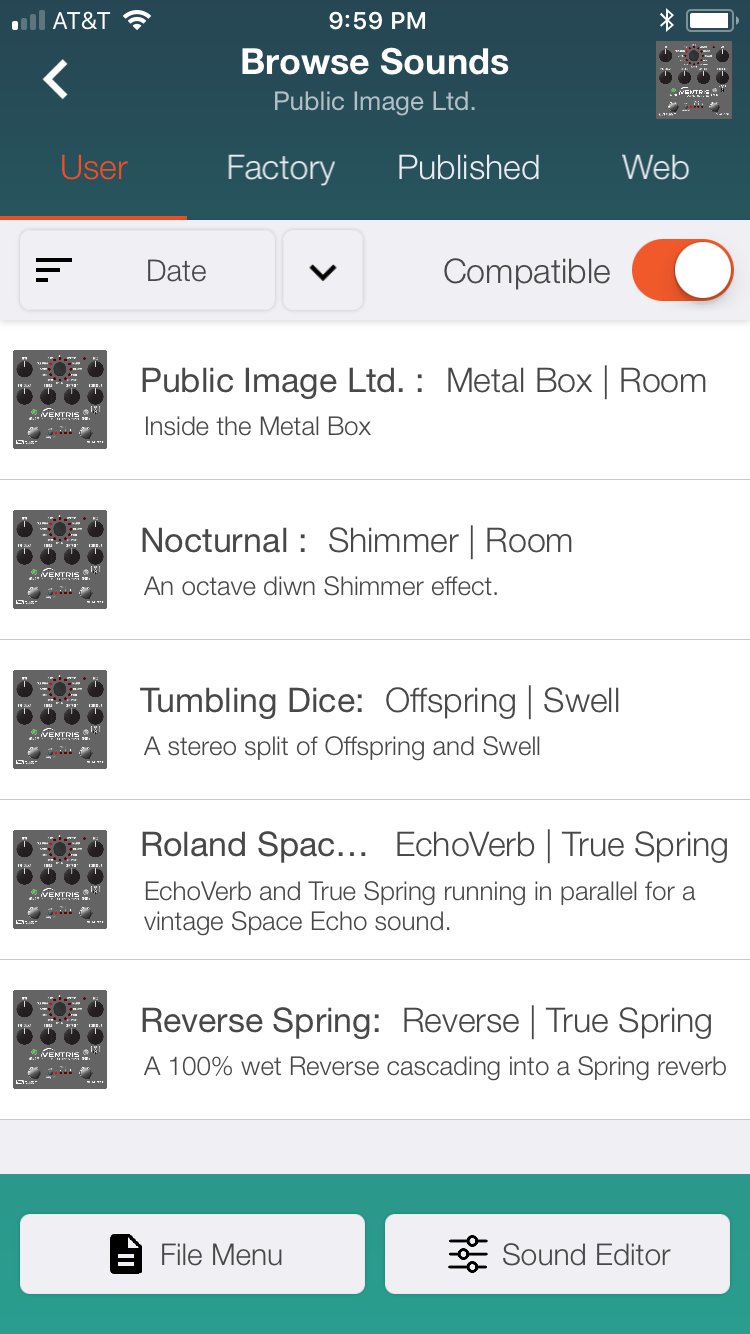
The Note icon at the bottom of the Pedal Selector page opens the Browse Sounds page. This is where all your personal and published presets are stored. It is also the place to browse and test presets that other Ventris owners have created. There are four preset tabs listed across the top of the page: User, Factory, Published, and Web.
- User Tab- This is your personal preset library. All the Ventris presets that you have created are stored in this tab.
- Factory Tab- A collection of Ventris presets created and curated by the Source Audio staff. It is a great place to go for some quick inspiration.
- Published Tab- A list of all the Ventris presets that you have published and made available to other Ventris owners in the Neuro community. To publish a preset you must go to the User tab, select the preset you want to publish and swipe it to the left. Swiping the preset reveals two options: Publish and Delete. Hit the Publish button to make your preset public.
- Web Tab - A complete collection of every Ventris preset published by all of the Ventris owners in the Neuro Community. Use the organizer tool located just below the tab listings to arrange the presets in order of Date, Preset Name, or User Name.

