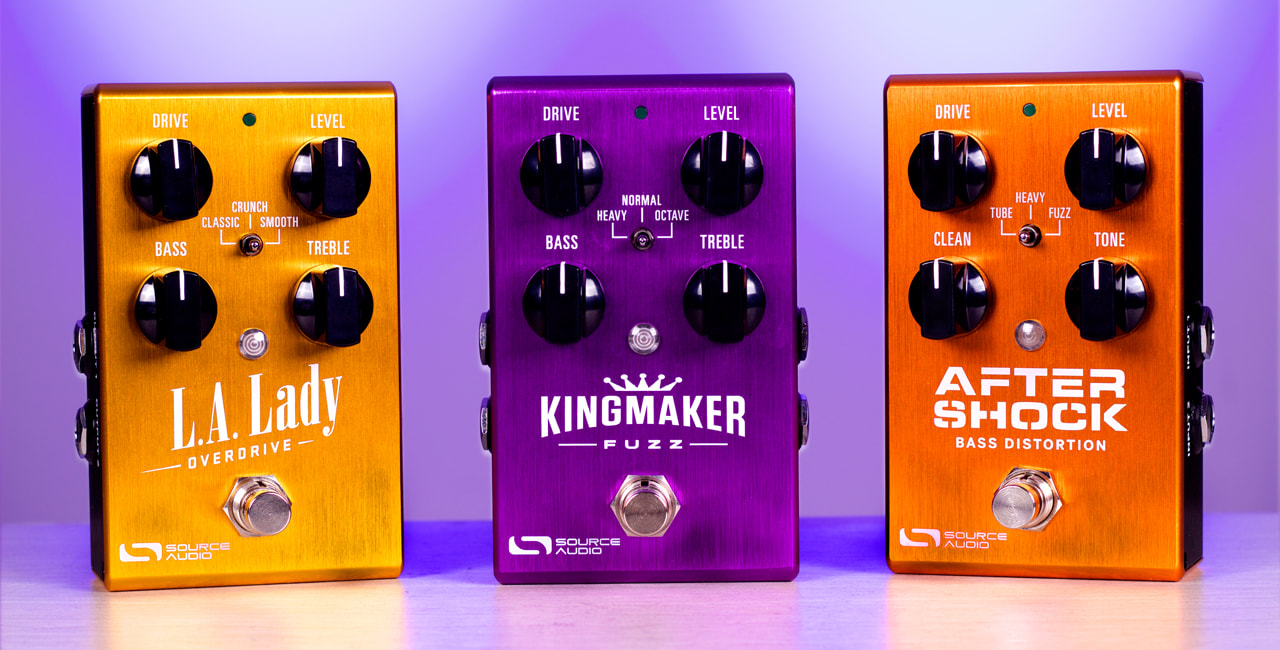
Navigating the Neuro Desktop Editor with the L.A. Lady Overdrive, Kingmaker Fuzz, and Aftershock Bass Distortion
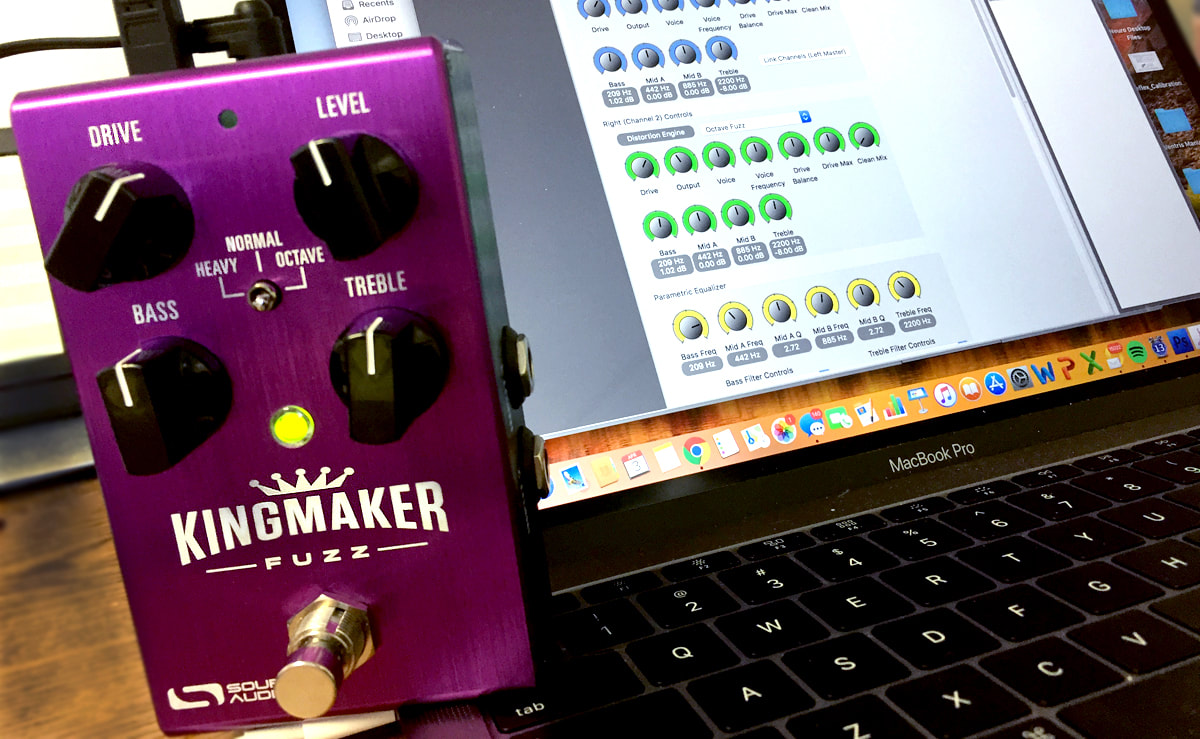
The Neuro Desktop Editor is an excellent tool for creating and organizing highly customized presets for your Kingmaker Fuzz, L.A. Lady Overdrive, and AfterShock Bass Distortion. The Neuro Desktop is a free download for Mac and Windows – visit our Downloads page and scroll down to Neuro Desktop to get it. Below is a top-to-bottom, line-by-line explanation of each and every adjustable parameter and function selector included in the Nuero’s overdrive Sound Editor.
For an overview of the basic functions of the Neuro Desktop Editor, read our Navigating the Neuro Desktop Editor blog.
For an overview of the basic functions of the Neuro Desktop Editor, read our Navigating the Neuro Desktop Editor blog.
The first thing to remember is that One Series overdrive pedals feature dual distortion engines. With the two distortion engines it’s possible to cascade overdrives, run them in parallel and mix them together, or configure them so that each distortion engine is routed to its own output (splitting your tones). This is why you will see redundant parameters listed in the Sound Editor – please remember, controls labeled “LEFT” adjust the first drive engine and controls labeled “RIGHT” control the second.
LEFT (CHANNEL 1) CONTROLS
LEFT (CHANNEL 1) CONTROLS
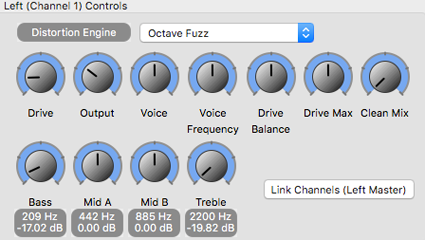
Distortion Engine (Left): This drop down menu allows you to select from the 40 plus distortion engines available in the L.A. Lady, Kingmaker, and AfterShock.
Drive (Left): Adjusts the amount of overdrive, fuzz, or distortion.
Output (Left): Adjusts the pedal’s overall output volume.
Voice (Left): Each overdrive/fuzz/distortion circuit features a VOICE control that is a gradual timbre adjustment affecting the overall character of the sound. It is essentially a midrange adjustment that sits within the overdrive circuit. It affects the midrange in subtle ways, increasing the VOICE setting above the mid-point provides a midrange boost, whereas decreasing VOICE setting below the mid-point provides a midrange cut. Many different sounds are available using the VOICE control.
Voice Frequency (Left): Adjusts the point in the frequency spectrum at which the VOICE control sits. Moving the VOICE FREQUENCY knob to the right causes the VOICE control to affect higher frequencies and moving it to the left causes the VOICE control to affect lower frequencies.
Clean Mix (Left): Adjusts the balance between a clean and distorted signal. Setting the knob all the way to the left creates a 100% distorted signal (this is the default setting for all of the drive engines and this is the setting you should use to recreate most traditional drive pedals). As you turn the CLEAN MIX knob to the right a clean and dirty crossfade will be applied until reaching a 100% clean signal at the full right position.
Drive Pre/Post Blend (Left): Here is a little known fact: within each of the pedal’s two drive engines there are two separate drive circuits. The DRIVE P/P BLEND offsets these drive elements often increasing one while decreasing the other to create mostly subtle, but sometimes very dramatic differences. The amount of impact this control has on the tone varies depending on which drive engine is being edited.
Drive Maximum (Left): Increases or decreases the level of overdrive or fuzz available to the DRIVE knob.
Bass (Left): Adjusts the low frequencies of the overdriven tone. By default this shelving filter sits around 200 Hz and functions as a shelf when it is boosted (gain > 0 dB) and a high pass when it is cut (gain < 0 dB). The frequency position of Bass level can also be adjusted with the BASS FREQ knob in the PARAMETRIC EQ section of the editor (see below).
Mid A (Left): Adjusts the lower midrange frequencies of the overdriven tone. By default this knob boosts or cuts a peaking filter around 442 Hz. The frequency center point of the MID A level can also be adjusted with the MID A FREQ knob in the Parametric Equalizer section of the editor (see below).
Mid B (Left): Adjusts the upper midrange frequencies of the overdriven tone. By default this knob boosts or cuts a peaking filter around 885 Hz. The frequency center point of the MID B level can also be adjusted with the MID B FREQ knob in the Parametric Equalizer section of the editor (see below).
Treble (Left): Adjusts the higher frequencies of the overdriven tone. By default this shelving filter sits around 2200 Hz and functions as a shelf when it is boosted (gain > 0 dB) and a low pass when it is cut (gain < 0 dB). The frequency position of TREBLE level can also be adjusted with the TREBLE FREQ knob in the Parametric EQ section of the editor (see below).
Link Channels (Left Master): There is a separate drive engine assigned to each of the L.A. Lady’s/Kingmaker’s/AfterShock’s Outputs, and both of these engines can be programmed independently. If, however, you want to link the two engines together and match the tone for both Outputs, click the LINK CHANNELS (LEFT MASTER) button. The controls in the Left (Channel 1) Controls editor will be applied to both engines.
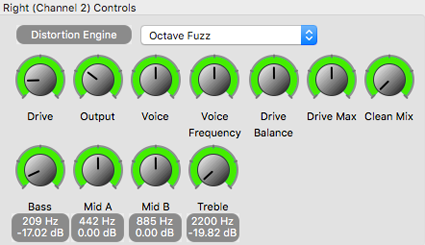
RIGHT (CHANNEL 2) CONTROLS
Drive (Left): Adjusts the amount of overdrive, fuzz, or distortion.
Output (Left): Adjusts the pedal’s overall output volume.
Voice (Left): Each overdrive/fuzz/distortion circuit features a VOICE control that is a gradual timbre adjustment affecting the overall character of the sound. It is essentially a midrange adjustment that sits within the overdrive circuit. It affects the midrange in subtle ways, increasing the VOICE setting above the mid-point provides a midrange boost, whereas decreasing VOICE setting below the mid-point provides a midrange cut. Many different sounds are available using the VOICE control.
Voice Frequency (Left): Adjusts the point in the frequency spectrum at which the VOICE control sits. Moving the VOICE FREQUENCY knob to the right causes the VOICE control to affect higher frequencies and moving it to the left causes the VOICE control to affect lower frequencies.
Clean Mix (Left): Adjusts the balance between a clean and distorted signal. Setting the knob all the way to the left creates a 100% distorted signal (this is the default setting for all of the drive engines and this is the setting you should use to recreate most traditional drive pedals). As you turn the CLEAN MIX knob to the right a clean and dirty crossfade will be applied until reaching a 100% clean signal at the full right position.
Drive Pre/Post Blend (Left): Here is a little known fact: within each of the pedal’s two drive engines there are two separate drive circuits. The DRIVE P/P BLEND offsets these drive elements often increasing one while decreasing the other to create mostly subtle, but sometimes very dramatic differences. The amount of impact this control has on the tone varies depending on which drive engine is being edited.
Drive Maximum (Left): Increases or decreases the level of overdrive or fuzz available to the DRIVE knob.
Bass (Left): Adjusts the low frequencies of the overdriven tone. By default this shelving filter sits around 200 Hz and functions as a shelf when it is boosted (gain > 0 dB) and a high pass when it is cut (gain < 0 dB). The frequency position of Bass level can also be adjusted with the BASS FREQ knob in the PARAMETRIC EQ section of the editor (see below).
Mid A (Left): Adjusts the lower midrange frequencies of the overdriven tone. By default this knob boosts or cuts a peaking filter around 442 Hz. The frequency center point of the MID A level can also be adjusted with the MID A FREQ knob in the Parametric Equalizer section of the editor (see below).
Mid B (Left): Adjusts the upper midrange frequencies of the overdriven tone. By default this knob boosts or cuts a peaking filter around 885 Hz. The frequency center point of the MID B level can also be adjusted with the MID B FREQ knob in the Parametric Equalizer section of the editor (see below).
Treble (Left): Adjusts the higher frequencies of the overdriven tone. By default this shelving filter sits around 2200 Hz and functions as a shelf when it is boosted (gain > 0 dB) and a low pass when it is cut (gain < 0 dB). The frequency position of TREBLE level can also be adjusted with the TREBLE FREQ knob in the Parametric EQ section of the editor (see below).
Link Channels (Left Master): There is a separate drive engine assigned to each of the L.A. Lady’s/Kingmaker’s/AfterShock’s Outputs, and both of these engines can be programmed independently. If, however, you want to link the two engines together and match the tone for both Outputs, click the LINK CHANNELS (LEFT MASTER) button. The controls in the Left (Channel 1) Controls editor will be applied to both engines.
RIGHT (CHANNEL 2) CONTROLS
Distortion (Right): See above.
Drive (Right): See above.
Output (Right): See above.
Voice (Right): See above.
Voice Frequency (Right): See above.
Clean Mix (Right): See above.
Drive Pre/Post Blend (Right): See above.
Drive Maximum (Right): See above.
Bass (Right): See above.
Mid A (Right): See above.
Mid B (Right): See above.
Treble (Right): See above.
PARAMETRIC EQUALIZER
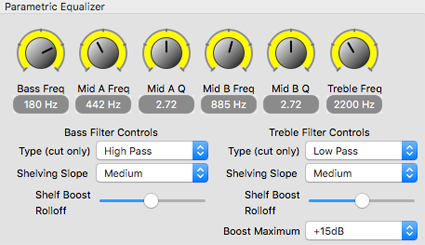
Bass Freq: Adjusts the frequency fulcrum point of the BASS level control (see above) for both the LEFT and RIGHT drive engines.
Mid A Freq: Adjusts the frequency center point for the MID A LEVEL knobs (see above). This adjustment is will be applied to both the LEFT and RIGHT engines.
Mid A Q: Adjusts the width of the frequency spectrum adjusted by the MID A level knobs. A low Q affects a large and gradually sloping area of the frequency spectrum surrounding the MID LEVEL center point (think a hill with a long, gradual slope on either side). A high Q affects a small and sharply sloping area of the frequency spectrum surrounding the MID LEVEL center point (think the Washington Monument). This adjustment will be applied to both the LEFT and RIGHT engines.
Mid B Freq: Adjusts the frequency center point for the MID B Level knobs (see above). This adjustment is will be applied to both the LEFT and RIGHT engines.
Mid B Q: Adjusts the width of the frequency spectrum adjusted by the MID B level knobs. See the MID A Q description for an explanation of the Q control. This adjustment is will be applied to both the LEFT and RIGHT engines.
Treble Freq: Adjusts the frequency position of the shelf filter associated with the TREBLE level controls (see above). The filter will be applied to both the LEFT and RIGHT distortion engines.
BASS FILTER CONTROLS:
Type (Cut Only): By default the BASS level sliders in the Right and Left Control sections (see above) function as a shelf when they are boosted (gain > 0 dB) and a high pass when they are cut (gain < 0 dB). This drop down menu allows you to reassign the frequency cut portion of the knob as Bass Shelving Filter.
Shelving Slope: Sets the incline of the slope on Bass Shelving Filter. Choose from Low (a gradual incline), Medium, or High (a steep incline).
Shelf Boost Rolloff: Rolls off the very low frequencies of the low shelf filter when the BASS level knobs are increased past 0dB.
TREBLE FILTER CONTROLS:
Type (Cut Only) By default the TREBLE level knobs (see above) function as a shelf when they are boosted (gain > 0 dB) and a low pass when they are cut (gain < 0 dB). This drop down menu allows you to reassign the frequency cut portion of the knob as Treble Shelving Filter.
Shelving Slope: Sets the incline of the slope on Treble Shelving Filter. Choose from Low (a gradual incline), Medium, or High (a steep incline).
Shelf Boost Rolloff: Rolls off the very top frequencies of the high shelf filters when the TREBLE level knobs are increased past 0dB.
Boost Maximum: Selects the highest point to which the TREBLE level controls can boost the high frequencies (adjusts LEFT and RIGHT engines simultaneously). In the dropdown menu choose from, Odb, +3dB, +6dB, +9dB, +12dB, +15dB and +20dB. By default the TBM sits at +15dB.
NOISE GATE AND ADDITIONAL FILTERS
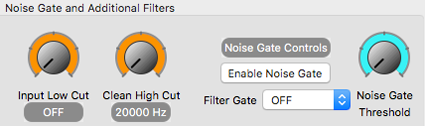
Input Low Cut: Cuts off all frequencies of the incoming signal below a certain point. As the knob moves from left to right the point at which frequencies are cut gets higher and higher. This is an especially useful control for tightening up a bass guitar tone. It’s often called a “brick wall filter” and it eliminates very low frequencies that are inaudible to humans but add significant stress to speaker cones and can have an overall negative effect on the tone.
Clean High Cut: Adjusts high frequencies of the clean signal when the pedal is engaged. This is useful for eliminating the higher frequencies of the clean signal when introduced with the DISTORTION/CLEAN MIX knob (see above).
NOISE GATE CONTROLS:
Enable Noise Gate: Engages or disengages a built in noise gate. The noise gate blocks the entire signal going to your amp when the instrument is not being played. This can be extremely helpful with high gain tones. When the button is blue, the Noise Gate is engaged.
Filter Gate: Works similarly to a noise gate but rather than shutting down the entire signal, the FILTER GATE blocks only the frequencies associated with the noise created by the distortion engines - because noise annoys. :-\ When engaged the FILTER GATE has three levels of sensitivity: LOW, MED, and HIGH.
Noise Gate Threshold: When the NOISE GATE is engaged, this slider controls the gate sensitivity.
I/O ROUTING AND CONTROL OPTIONS
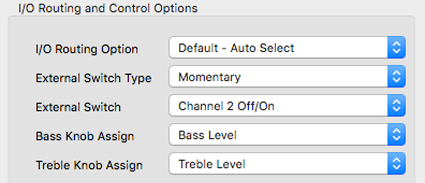
I/O Routing Options: We have taken full advantage of the stereo in and out jacks on all of the One Series pedals. And, as mentioned above, the L.A. Lady, Kingmaker, and AfterShock all have dual drive elements, which can be independently loaded with any of the 40 plus drive engines available in the Neuro App. This allows the pedals a number of interesting routing options including internally cascaded overdrives, parallel overdrives mixed to one signal, sending different overdrive tones to each of the two outputs, and more. Check out our Kingmaker Fuzz, L.A. Lady Overdrive, and AfterShock Bass Distortion: Signal Routing Options blog for more details.
External Switch Type: Selects between a MOMENTARY or LATCHING switch function when using the Source Audio Tap Tempo Switch to externally engage/bypass overdrive engines. A momentary switch affects the change only while the switch is held down. A latching switch effects the change once the switch is pressed and released, then changes back to the original settings when the switch is pressed again. Check the EXTERNAL SWITCH CONTROL OPTION description (below) for more details on external switch control.
External Switch: With the L.A. Lady, Kingmaker, and AfterShock, it is possible to use the Source Audio Tap Tempo Switch (available at the Source Audio Online Store) to engage and disengage the dual overdrive engines in a variety of ways. Below are listed the different switching functions and how to use them.
TREBLE KNOB ASSIGN: Same as above, but for the TREBLE knob. ;-)
EXTERNAL CONTROL
External Switch Type: Selects between a MOMENTARY or LATCHING switch function when using the Source Audio Tap Tempo Switch to externally engage/bypass overdrive engines. A momentary switch affects the change only while the switch is held down. A latching switch effects the change once the switch is pressed and released, then changes back to the original settings when the switch is pressed again. Check the EXTERNAL SWITCH CONTROL OPTION description (below) for more details on external switch control.
External Switch: With the L.A. Lady, Kingmaker, and AfterShock, it is possible to use the Source Audio Tap Tempo Switch (available at the Source Audio Online Store) to engage and disengage the dual overdrive engines in a variety of ways. Below are listed the different switching functions and how to use them.
- Channel 2 Off/On: Completely shuts down the output level of the RIGHT drive engine when it is turned off. This is useful when running the two overdrive engines in parallel and toggling between the LEFT engine by itself and mixing together the LEFT & RIGHT engines.
- Channel 2 Bypass: Engages and disengages the RIGHT distortion engine, but continues to pass a clean signal when the RIGHT engine is bypassed. This is useful when cascading the two overdrive engines and bypassing or engaging the RIGHT engine via the external switch.
- Channel 1 Off/On: See the RIGHT engine description above and translate it for the LEFT side.
- Channel 1 Bypass: See the RIGHT engine description above and translate it for the LEFT side.
- Channel 1/2 Switch: Enables the external switch to select between the LEFT and RIGHT drive engines. This function will completely shut down the dry signal of the distortion engine being bypassed so it’s not a good idea to use it when cascading the distortion engines, because it will completely shut down your guitar signal. Always run your distortion engines in parallel when using this EXTERNAL SWITCHING OPTION.
TREBLE KNOB ASSIGN: Same as above, but for the TREBLE knob. ;-)
EXTERNAL CONTROL
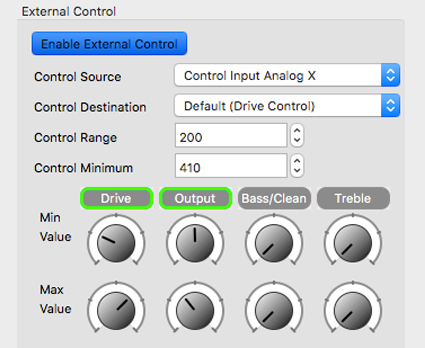
Enable External Control: Click on this button to enable the pedal’s external control options. External controls options include the 1/8” Sensor Output of a Source Audio Dual or Reflex Expression Pedal, a Hot Hand 3 Wireless Controller, or a standard ¼” expression pedals (TRS: Tip/Expression – Ring/Power – Sleeve/Ground) plugged into a Neuro Hub. When the button is blue, External Control is enabled.
Control Source: Selects which type of expression controller and input will be used for the preset. Choose between the following:
Control Destination: By default an expression pedal will control the pedal’s Drive control. However, if you would like to control alternate knob parameters with an expression pedal, select MAPPED TO KNOBS from this dropdown menu.
Control Range: Use this field to select the maximum range of an external expression pedal. Setting this value lower than 1023 will give you additional padding at your expression pedal’s top position, assuring that you will reach the assigned parameter’s maximum value without mashing the expression pedal to its full toe down position.
Control Minimum: Use this field to select the minimum value of an external expression pedal. Similar to the CONTROL RANGE field, setting this value higher than 0 will give you additional padding at your expression pedal’s bottom position, assuring that you will reach the assigned parameter’s minimum value without mashing the expression pedal to its full heel down position.
Expression Control to Knob Mappings: This is a simple way to assign an external expression controller to any of your pedal’s knob parameters. After selecting the expression CONTROL SOURCE and MAPPED TO KNOBS from the CONTROL DESTINATIONS dropdown menu, simply set the Min (heel down) and Max (toe Down) values for each of the parameters. Please note that you can control multiple knobs simultaneously.
HARDWARE OPTIONS (GLOBAL)
Control Source: Selects which type of expression controller and input will be used for the preset. Choose between the following:
- Control Input Analog X: Selects the 1/8” Control Input as the expression input. Choose this selection if you’re using the 1/8” Sensor Out on the Source Audio Dual Expression Pedal or Reflex Universal Expression Controller. This selection also works for the Hot Hand 3 Universal Wireless Controller on the X axis.
- Control Input Analog X: Also selects the 1/8” Control Input as the expression input. This selection also works with the 1/8” Sensor Out on Source Audio Expression Pedals or the Hot Hand 3 Universal Wireless Controller on the Y axis.
- Hub Digital Hot Hand X: Use this selection if your Nemesis is plugged into a Neuro Hub and you want to use the X axis of a Hot Hand 3 plugged into a Sensor In jack on the Hub.
- Hub Digital Hot Hand Y: Same as above, but for the Y axis.
- Hub Digital Expression: Use this selection if your Nemesis is plugged into a Neuro Hub and a standard ¼” TRS expression pedal is plugged into the EXP In jack on the Hub.
Control Destination: By default an expression pedal will control the pedal’s Drive control. However, if you would like to control alternate knob parameters with an expression pedal, select MAPPED TO KNOBS from this dropdown menu.
Control Range: Use this field to select the maximum range of an external expression pedal. Setting this value lower than 1023 will give you additional padding at your expression pedal’s top position, assuring that you will reach the assigned parameter’s maximum value without mashing the expression pedal to its full toe down position.
Control Minimum: Use this field to select the minimum value of an external expression pedal. Similar to the CONTROL RANGE field, setting this value higher than 0 will give you additional padding at your expression pedal’s bottom position, assuring that you will reach the assigned parameter’s minimum value without mashing the expression pedal to its full heel down position.
Expression Control to Knob Mappings: This is a simple way to assign an external expression controller to any of your pedal’s knob parameters. After selecting the expression CONTROL SOURCE and MAPPED TO KNOBS from the CONTROL DESTINATIONS dropdown menu, simply set the Min (heel down) and Max (toe Down) values for each of the parameters. Please note that you can control multiple knobs simultaneously.
HARDWARE OPTIONS (GLOBAL)
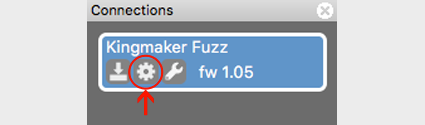
Select the gear icon in the L.A. Lady Overdrive, Kingmaker Fuzz, or AfterShock Bass Distortion display within the Connections section of the Neuro Desktop Editor (this is on the left side of the Neuro Desktop workspace). This will open up a separate window displaying all of the global hardware options. Each option is listed below.
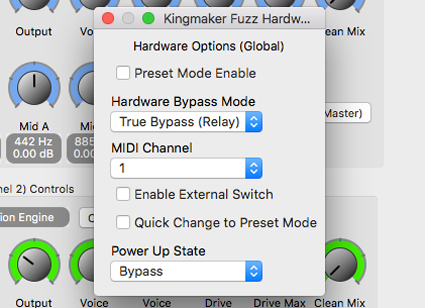
Preset Enable Mode: Automatically switches the pedal to Preset Mode. In Preset Mode the pedal’s center LED will turn red and it is possible to save the settings for all of the pedal’s adjustable parameters (this includes knob parameters). In Preset Mode it is possible to save a separate preset in each of the pedal’s three toggle switch positions. When the pedal is in Normal Mode (when the Preset Enable Mode is unchecked) the physical position of the front panel knobs will always reflect the sound coming from the pedal.
Hardware Bypass Mode: Use this dropdown menu to select between a true or buffered bypass. TRUE BYPASS (RELAY) is a hardwired connection that completely bypasses the effect processor when the effect is turned off. ACTIVE ANALOG (BUFFER) bypass provides a subtle boost to your dry signal when the effect is turned off. A buffered bypass can be useful for boosting a diminished signal, which often happens to a signal chain that includes a lot of effects pedals.
MIDI Channel: If you have your One Series drive pedal plugged into a Neuro Hub and you’re controlling it with a MIDI controller, there may be cause to assign it to its own MIDI channel. Use this dropdown menu to select between channels 1 to 16. Please note that in most cases it’s best to leave all of the pedals connected to a Neuro Hub assigned to Channel 1.
Enable External Switch: It is possible to use a Source Audio Tap Tempo Switch to perform a number of different functions. See the EXTERNAL SWITCH TYPE menu in the I/O Routing and Control Options section for a list of options. You must check this box to use the Tap Tempo Switch with your One Series pedal.
Quick Change Preset Mode: If you want to switch your One Series pedal to Preset Mode from Normal Mode (or vice-versa) without connecting to the Neuro Desktop or Mobile Editor, you can do it by disengaging the pedal then pressing and holding the pedal’s footswitch for roughly five seconds (until the center LED changes color). Check this box if you would like to shorten the amount of time it takes the pedal to change modes during this process. QUICK CHANGE PRESET MODE shortens the process to roughly two seconds.
Power Up State: Use this dropdown menu to select whether your One Series pedal will power up in either the Engaged or Bypassed state.
AND FINALLY, A LIST OF ALL THE DIFFERENT DRIVE ENGINES AND THE PRE-AMP OR PEDAL THAT INSPIRED IT:
0 Tube Drive - Marshall amp-style overdrive
1 Smooth Tube - Mesa boogie pre amp distortion
2 Power Stage - Fulltone Distortion Pro
3 Crunch Tube - Our own distortion, not based on any particular sound. It’s a more aggressive tube distortion.
4 TS9000 - Ibanez Tube Screamer
5 Big Pi - EHX Big Muff Pi
6 El Raton - ProCo Rat
7 Fuzz Façade - Dallas Arbiter Fuzz Face
8 Bender - Tone Bender mk II
9 Metal - EHX Metal Muff
10 Octave Fuzz - Octavia
11 Gated Fuzz - inspired by the Woolly Mammoth, but not very close at all. (rsmith601's words, not mine)
12 Bass Tube Drive
13 Bass Smooth Tube
14 Bass Power Stage
15 Bass Crunch Tube
16 Bass TS9000
17 Bass Big Pi
18 Bass El Raton
19 Bass Fuzz Façade
20 Bass Bender
21 Bass Metal
22 Bass Octave Fuzz
23 Bass Gated Fuzz
24 Gated Fuzz II - original
25 Gated Fuzz III - original
26 TS 9001 - Ibanez TS 808?
27 Maestro FZ-1A - Maestro FZ-1A
28 Bigger Pi - Skreddy Mayonnaise
29 Foldover - original
30 OhSeeDee - Fulltone OCD
31 Fuzz Face II
32 DS-1 - Boss DS-1
33 Rat II
34 Bender II
35 Metal II
36 Octave II
37 Smoked Glass C4L - Darkglass B3K
38 38 Special - original
39 Smooth Tube II
40 Power Stage II
41 Crunch Tube II
42 Grated Bass - original
43 Clean
44 Smoked Glass D5M – Darkglass B3K
45 The Klone - Klon Centaur
46 Pepperface Fuzz - Analogman Peppermint Fuzz
47 Vari-Screamer - Nobels ODR-1 Natural Drive
48 Foldover II - Original
49 Germanium Muffin - Germanium EHX Big Muff
That’s all there is, there ain’t no more. If you have additional questions, please feel free to email us for tech support at contact@sourceaudio.net.